My intention is to blog more about the ups and downs of my software development technologies I’m currently using. While I’m not ready to announce what I’m working on (primarily to prevent any more “SHIP IT YESTERDAY!” anxiety than I already have), I can talk about the tools and tech without concern about shipping schedules or the “what” yet.
The List - April 2025
One thing to note — my 99%-time project right now is building a web-based application. So, the list is definitely influenced by that. These are in no particular order:
Rust. Sure, it’s popular, literally everyone is rewriting everything using Rust 😁, while all the vibe-coders are wishing their LLMs would do better Rust coding. I’m definitely not a vibe coder. I picked it for 2 reasons: cross-platform capabilities (Windows, MacOS, and Linux*). Further the crate ecosystem (packages) is robust and for my project, I need a robust web-server host. While it’s definitely not a favorite programming language from a syntax perspective, there are many things I do like about it. Further, with Axum, I can bundle the entire content of the web application into a single executable, so distribution is a snap (no, not Snap).
Rust Axum - this is the web application framework I’m using with Rust. It’s fast and straightforward to use. I tried a few other options and many are “fine” as well, this one just was slightly better for my needs and is well documented (and used, so it’s easier to get help if I get stuck).
TypeScript - I like types. Even inferred types. JavaScript is fine, but sprinkle on a few TypeScript type declarations and I am confident my code is more accurate and will have fewer bugs. I’ve tried JSDoc — and it’s more overhead for less benefit. One common issue with TypeScript is that it’s errors are not always clear, and a lot of libraries do gymnastics with types to attempt to provide an ultimate level experience. When it works — great! When it doesn’t, it can be very frustrating.
Svelte - I’ve used a lot of web and UI frameworks in the past few decades, but Svelte is the one that I keep coming back to. It’s the closest to “bare-metal” web development that is available. It has a few bells in whistles (like Runes/signals) that kick it up a notch. Svelte 4 was good, but Svelte 5 is the one that helps me be consistently productive. The primary downside is the availability of pre-built UI widgets. There are a few options that I’ll discuss in a later post, but the community hasn’t created the same quantity as is available for React.
Svelte Kit - I use Svelte Kit for static (MPA/SPA) site generation. I’m not using it for dynamic content generation or server rendering. From what I’ve read, this is not uncommon. You’ll get client side routing and static generation as desired.
Visual Studio Code - Look. I’ve tried other editors, and the extensions available for VSCode are so numerous that it’s rare when something isn’t available for VS Code. Unlike other developers who seem to enjoy suffering through printf or console.log as a technique for debugging an application, I make heavy use of debuggers. Debugging Rust works like a charm (for what it is). I’ve tried many others, and I keep returning to VS Code.
MacOS & Mini - I bought the M4 mini late last fall. It’s plenty fast. I routinely switch to using Windows so I frequently use the wrong keyboard combinations for copy/paste/cut. Ugh.
Ubuntu Server - I do nearly all development in a VS Code remote dev container over SSH. Not only does it make my development environment accessible from anywhere, I’m assured of consistent development environment experiences every time. I’ve crafted a few Docker configurations that handle all of my needs. I have Ubuntu running exclusively on a centralized hardware in our house so that I don’t need to hear it’s fans during the day.
Productivity Boost
The wisest thing I’ve done regarding my productivity is buying the Mac.
Buying the Mac was not for the reason you might imagine. I’m not more productive with a Mac specifically.
I now have a computer (the Mac) dedicated to “work” and a PC dedicated to “everything else.”
It’s remarkable how much more focused I’ve been able to be with this configuration.
I couldn’t trust myself to not-hobby during my work hours (especially as I work in the same location as my hobbies are located). By buying the Mac, most of the “hobby” software isn’t available either as I’ve historically bought software for Windows. Even having no easy access to personal email address is a big productivity boost. I could have bought a second PC, but buying the Mac made better sense since I eventually plan to have the app I’m building work on MacOS as well.
Maybe Soon
Elixir - Depending on how other things go … my wife is working on a training course and needs a web app/site for it. I’ve learned Elixir (and Phoenix) and it’s a serious contender. I could use SvelteKit, but there’s a lot of “noise” it adds to just building a web site (plus features like auth, and payments).
Zig - I like Zig. I’ve been very productive building things in Zig. It’s refreshing simple when compared to other languages. Biggest downside really is the lack of a complete package system. I’ve even explored using Rust and Zig together so that I could get the best of both.
🤓 - Did you know that I had a quote on the TypeScript web site for a year or more?
Had you heard that Epic dabbled with Delphi back in the 1990s? It’s true!
It was far more than dabbling though.
2025 marks the 30th anniversary of the 1.0 release of Delphi. Regardless of whether you pronounce it del-fee or del-fy, it’s impressive that the platform and language is still available for sale today 30 years later (and has a healthy open source alternative Lazarus)! While Delphi never achieved the fame and fortunes of the elite technical stacks, it remained a valid and reasonable choice for building software for many companies for decades (and still does today on a much smaller scale).
Why isn’t Epic using it today if it was more than just a dabble?
One word: Borland.
A small R&D team had formed shortly after Delphi was released at Epic to investigate the possibility of building new and rebuilding existing Epic Windows applications using Delphi rather than the current choice of Visual Basic. While there were a number of technical issues with Visual Basic that could have been rectified by Epic teams better designing and architecting their applications, Visual Basic had a number of hard limits that were making application design and construction more challenging.
One slowly growing issue was the fact that applications weren’t “dynamic.” There was no practical way for a Visual Basic developer at the time to create an application from components and run an application efficiently based on configuration. There was no practical way to share code except for copies to be made. Creating anything reusable was a chore on a good day. It was disappointing, but we all knew even if we were afraid to admit it that Visual Basic was not the ideal programming language for a rapidly growing suite of connected applications.
Delphi offered Windows up on a wonderful platter of tasty IDE goodness. The IDE was as polished as Visual Basic (which was top of the class back then by a long shot). It exposed Windows APIs when needed, and provided ways to build components and libraries in a far more usable fashion. The provided component library (the Visual Component Library) was extensive and full source code was included! There was no magic as to how they’d built the library, so we could dive in deep and learn without guesswork.
Once the initial investigation happened, we cautiously green-lit the development of a replacement shell and library for all applications. Applications would be provided a shell and an extensive component library with comprehensive ways of building a more integrated and dynamic application experience.
There were 2 FTEs and one about half-time to quarter time.
We spent about 8 months working on the project and then in an afternoon we archived the project to shared NAS folder. Goodbye Delphi. 😢 It was never heard from or seen again at Epic (although last I knew the code was still in a folder on the shared NAS development drive zipped up until someone nukes it and no one misses it).
Delphi was a great platform that allowed us to fully exercise the Windows operating system and not be held back by the numerous limitations of Visual Basic. The development environment and langauge was remarkably freeing without the complexities of using Windows APIs directly or 😲: using the alternatives like the Microsoft Foundation Class libraries paired with C and C++ (my positive spin on that library is that it’s come a long way since it was first released in 1992 and has gone through a lot of growing pains).
What happened to Delphi at Epic?
Borland stock tanked: A LOT.
It’s frustratingly difficult to find the stock prices for a company that has undergone sales, etc. over the years. I can’t find the numbers. BUT, I recall the stock fell from around $80 to $2 in the course of a few months. Borland was struggling with product and market fit. Their revenue was down across the board and competitors like Microsoft were stepping up.
Betting the future Epic development platform on a product that may be sold or cancelled entirely was not a tenable plan. It was a disaster brewing. I know we fielded more than a few questions from then active Epic customers about whether Borland was a safe path for us.
Good news though!
In October of 1996, Microsoft announced Visual Basic 5 (beta). Epic had actually been on the beta program for quite a while, but relying on a “future” unpublished version wasn’t wise — there were a lot of changes happening and frequent updates (weirdly, I was the only person actually approved to access the beta due to the agreement we’d signed as it was some connections I’d established with a few amazing Microsoft support engineers that had ultimately provided us with access). Like with many Microsoft apps and platforms, the final shipping product often differs from the betas quite significantly.
Microsoft radically improved Visual Basic by adding control creation as part of the core environment and language. Not only could a developer create a packaged control that could be used by any ActiveX host, reusable code could be assembled into a compiled DLL (still as ActiveX, but with no UI). It was remarkable. It was all in Visual Basic. The final solution and techniques were a lot easier than Delphi too.
These changes were what Epic teams really needed to scale and share better than they had been. VB 5, now only 32 bit (thankfully) also allowed native code compilation, so gone were the days of interpreted code performance smells. Performance dramatically improved in many areas (but I’ll say that contrary to many untested opinions, the VB runtime interpreter was remarkably fast and was not a bottle-neck for many applications). This was still the era of Windows 95 being the primary OS, so there were still a lot of road-blocks, but the language and environment was no longer the stumbling block it had become in VB3. (Visual Basic 4 was primarily an upgrade to optional 32 bit support and some spit and polish).
Very shortly after, I pivoted to working on Visual Basic 5 infrastructure and building out the core Foundations GUI components that would be used for decades (thankfully retired now!).
I don’t miss Delphi at all, but it was a fun project.
I really appreciate you stopping by and reading my blog!
You might not know that each Epic blog post takes me several hours to write and edit.
If you could help me by using my Amazon affiliate links, it would further encourage
me to write these stories for you (and help justify the time spent). As always, the links don't add cost to the purchase
you're making, I'll just get a little something from Amazon as a thanks.
I'll occasionally write a blog post with a recommendation and I've also added a page dedicated to some of my more well-liked things. While you can buy something I've recommended, you can also just
jump to
Amazon and make a purchase. Thanks again!
How to Flash Tasmota to a Sonoff S31 With no Soldering
If you buy something from a link, Acorn Talk may earn a commission. See my Affiliate Programs statement.
Most instructions for flashing the Tasmota firmware to a Sonoff S31 wifi smart plug include a step of temporarily soldering some wires to the S31. No thanks. While I can probably manage it, they’re small solder pads and I didn’t want to mess up a brand new S31 with a botched solder attempt.
Here’s a way that involves a few small purchases that you can use in other projects and future S31s you may purchase.
Exposing the Internals
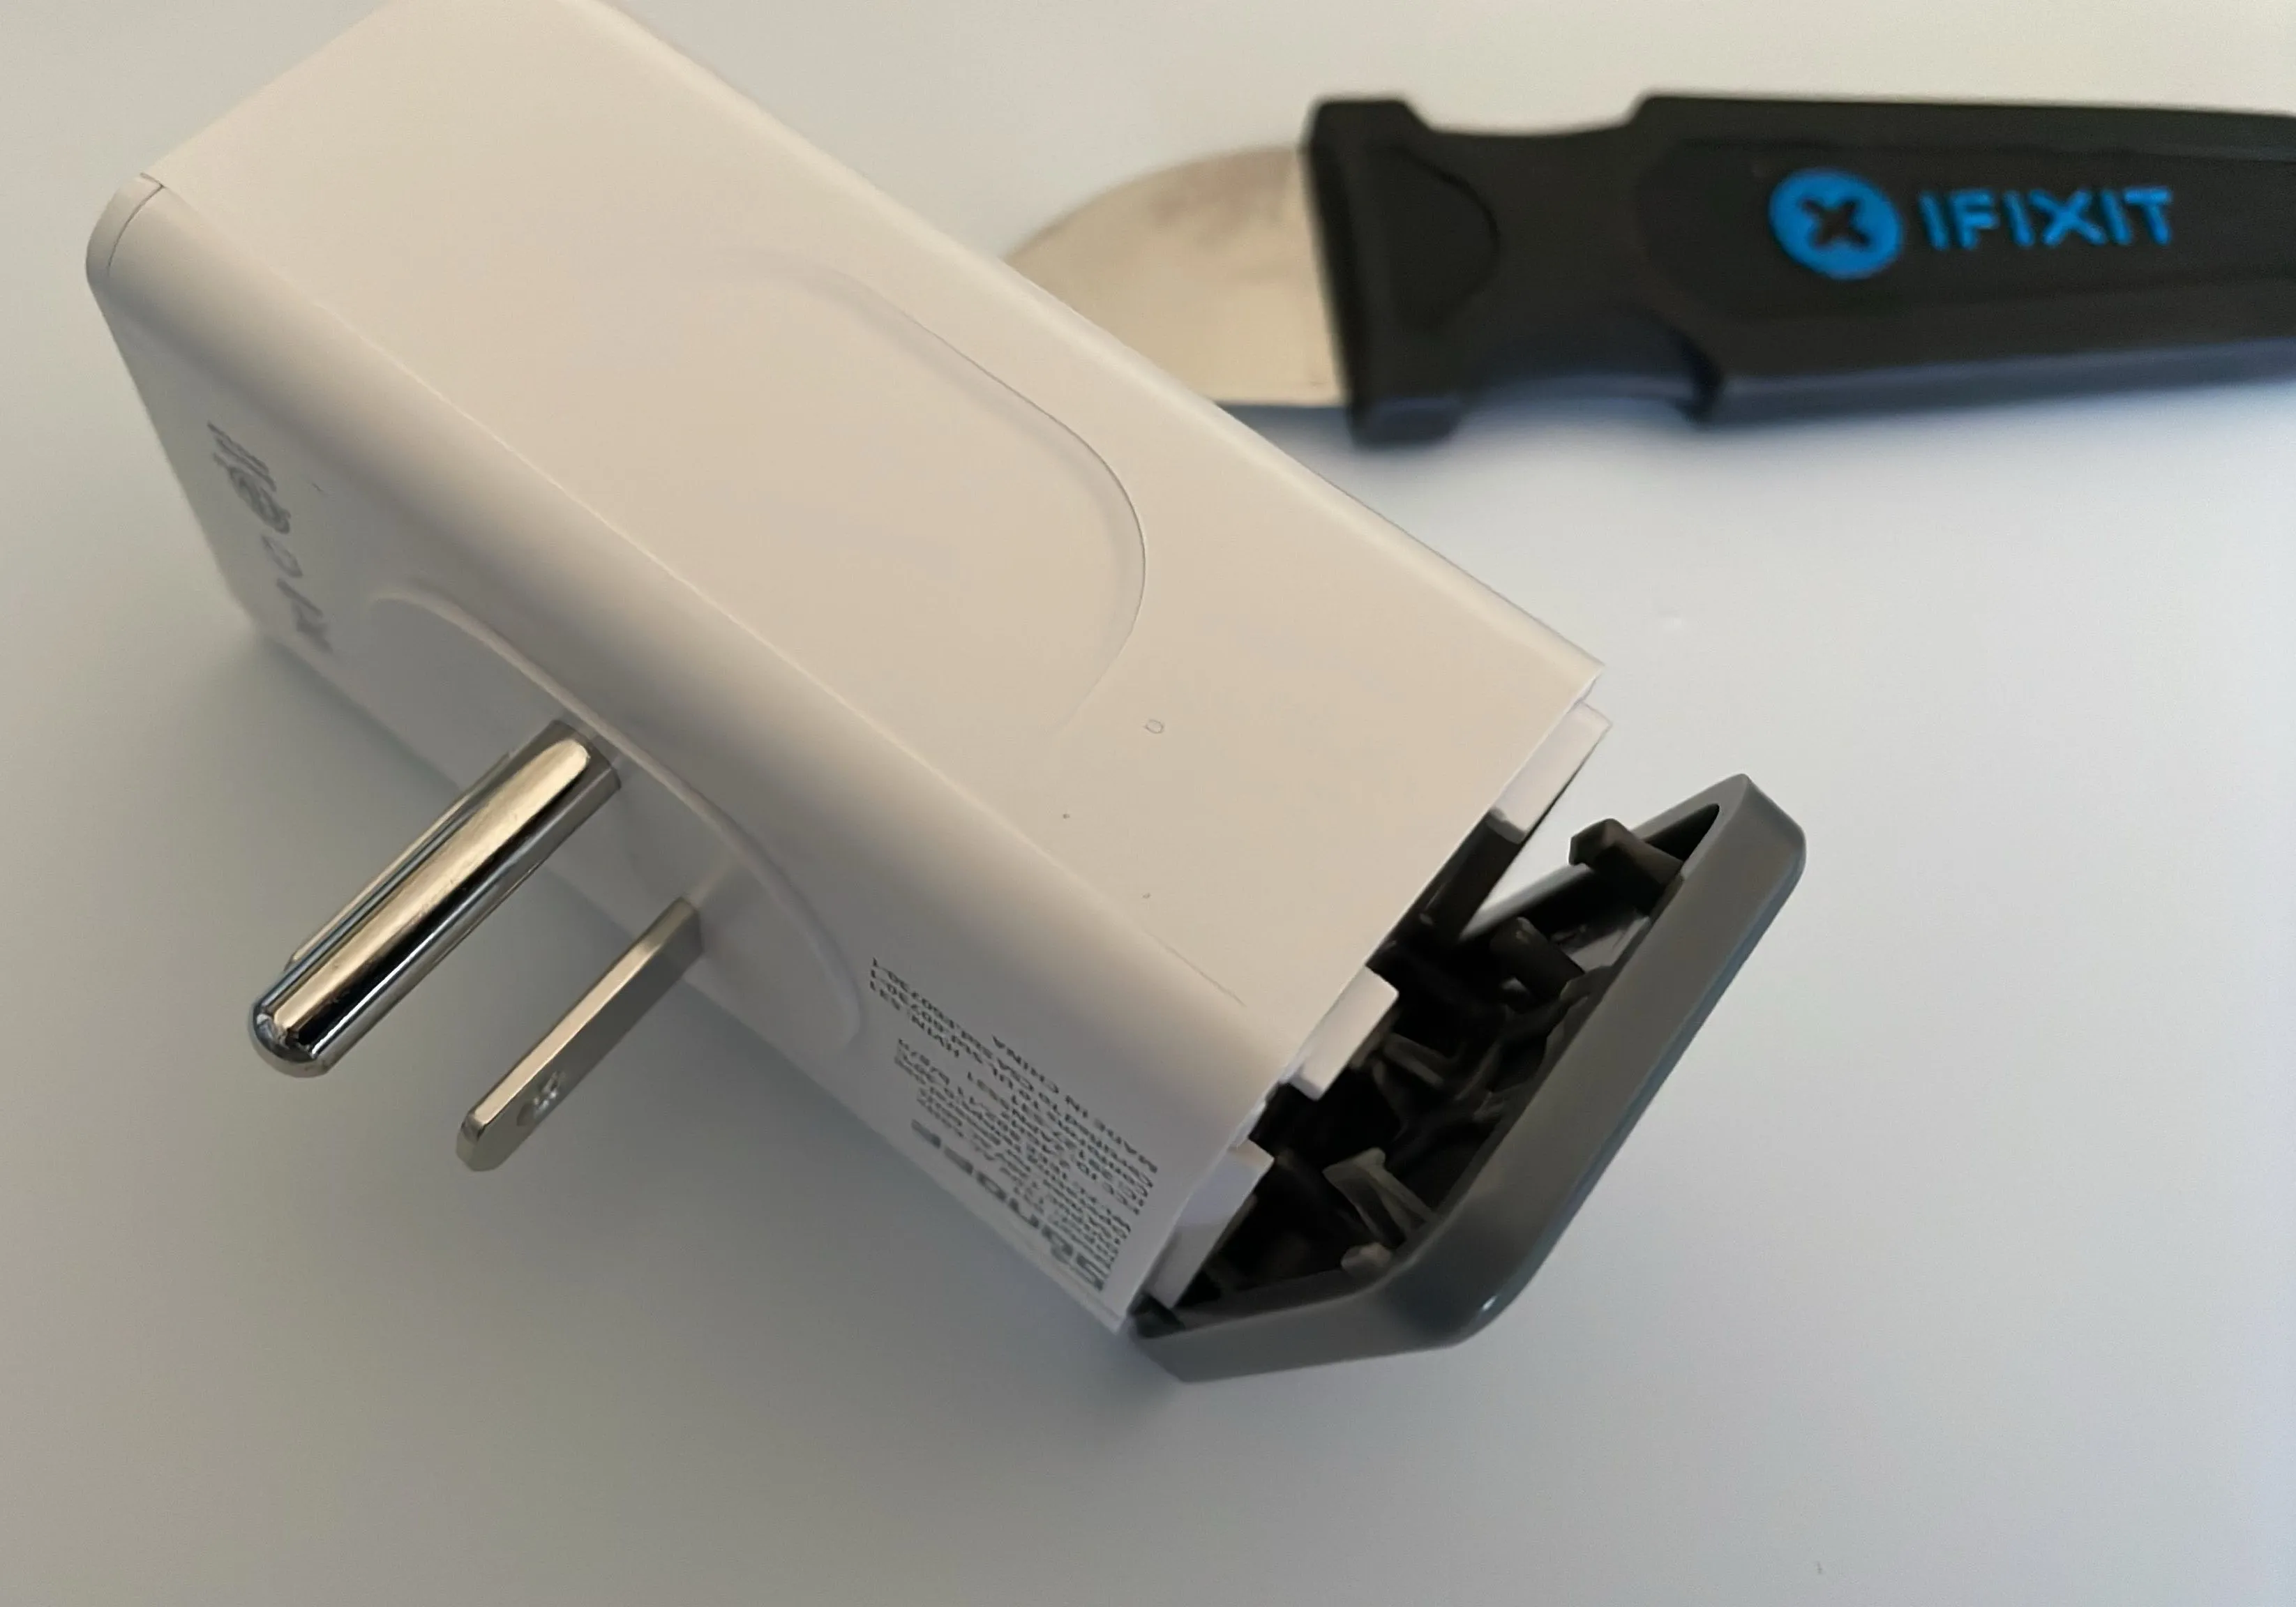
First, disassemble the S31 by using either a small blade flat-head screw driver, your stronger than mine finger nails (ouch), or something like the iFixit Jimmy. I used the Jimmy for many projects and use it often. It’s a no fuss simple way of gently prying open electronics. A thin screw driver may work as well, but be careful or you may damage the case.
UNTIL YOU HAVE COMPLETED ALL STEPS AND REASSEMBLED THE SMART PLUG, THE SMART PLUG MUST NOT BE CONNECTED TO MAIN ELECTRICITY (like 120V). DO NOT PLUG IT IN UNTIL THE PROCESS IS COMPLETE AND EVERYTHING IS SNAPPED BACK TOGETHER. SERIOUSLY. AMPS CAN KILL.
After some careful prying:
The gray end pops should snap off (don’t worry, there are no wires under the gray plastic cap that you may damage). There are two small screw covers that slide off the edges of the back, revealing 3 screws in total.
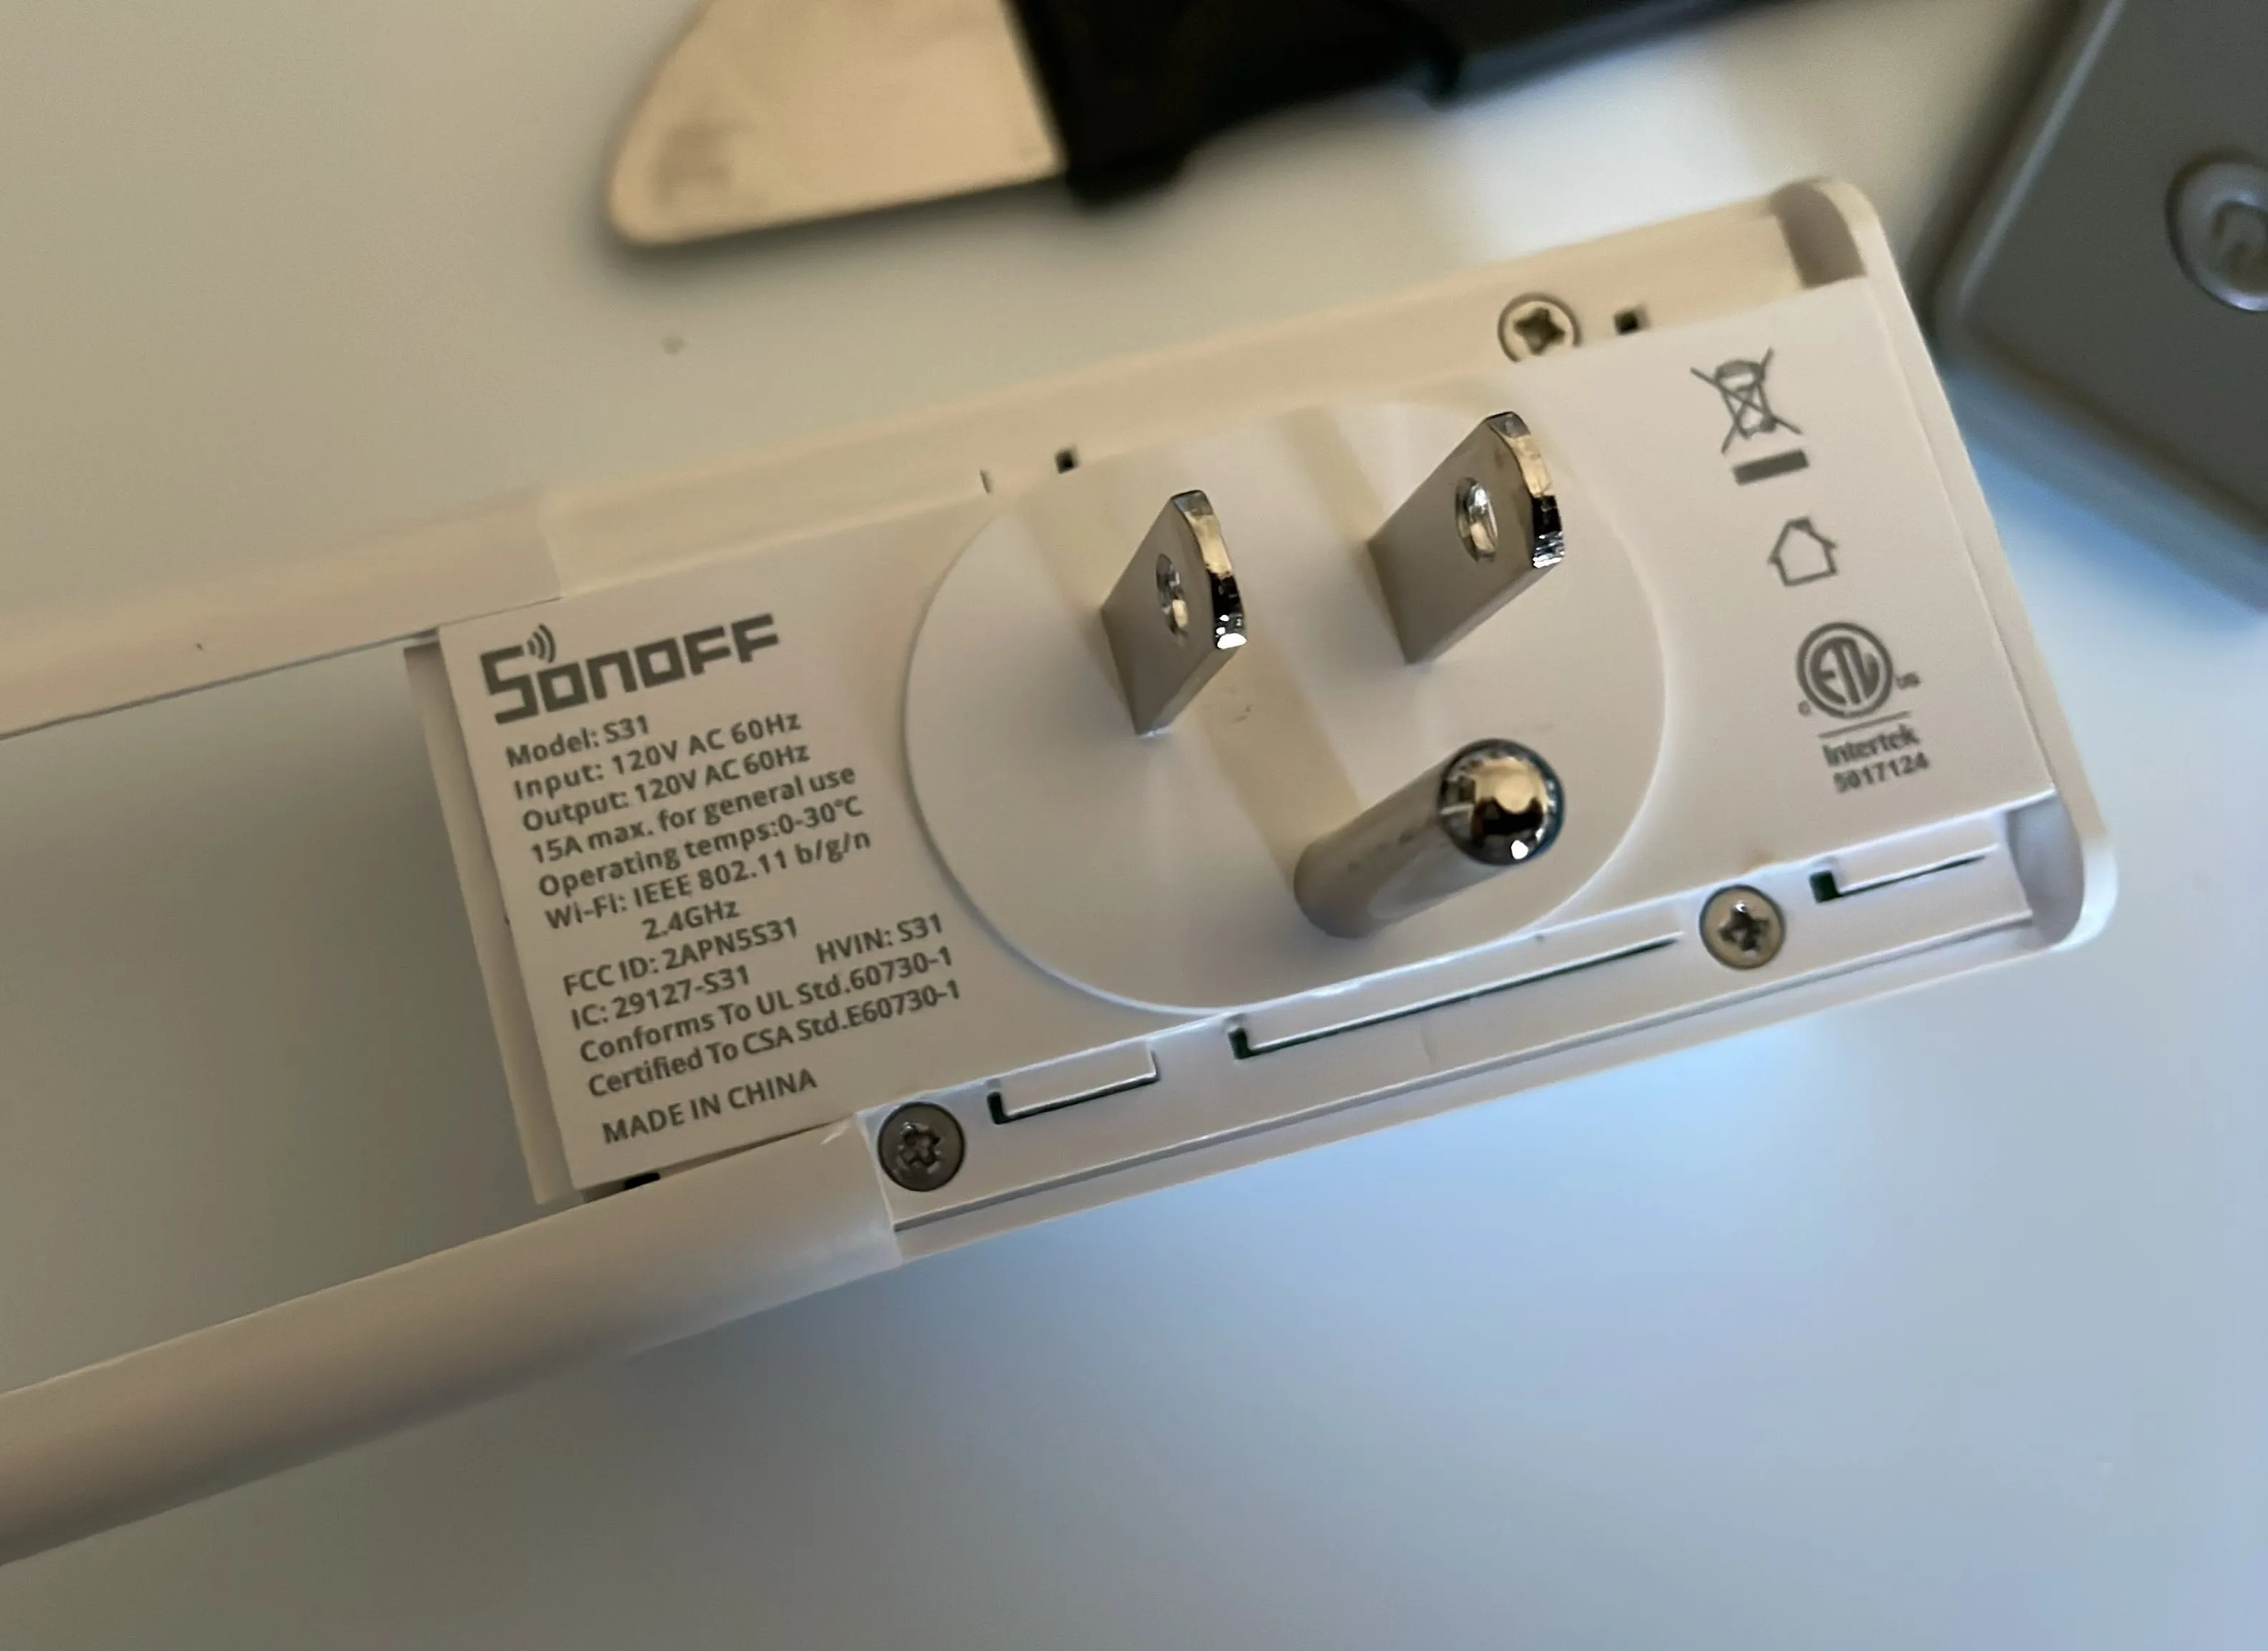
Once you’ve unscrewed those you can pull the separate the two remaining parts of the smart plug. You’ll be left with a plastic piece (the front) and all of the electronics.
Solder-Free Connections
The trick to the solder-free option is to buy an inexpensive set of breadboard jumper wires with test leads, like these Goupchn Test Hooks. The linked option is exactly what I bought and used. They worked like a champ.
Make sure that the switch on the device is set to 3.3V. Failure to make this change is likely to permanently damage the S31 rendering it e-waste.
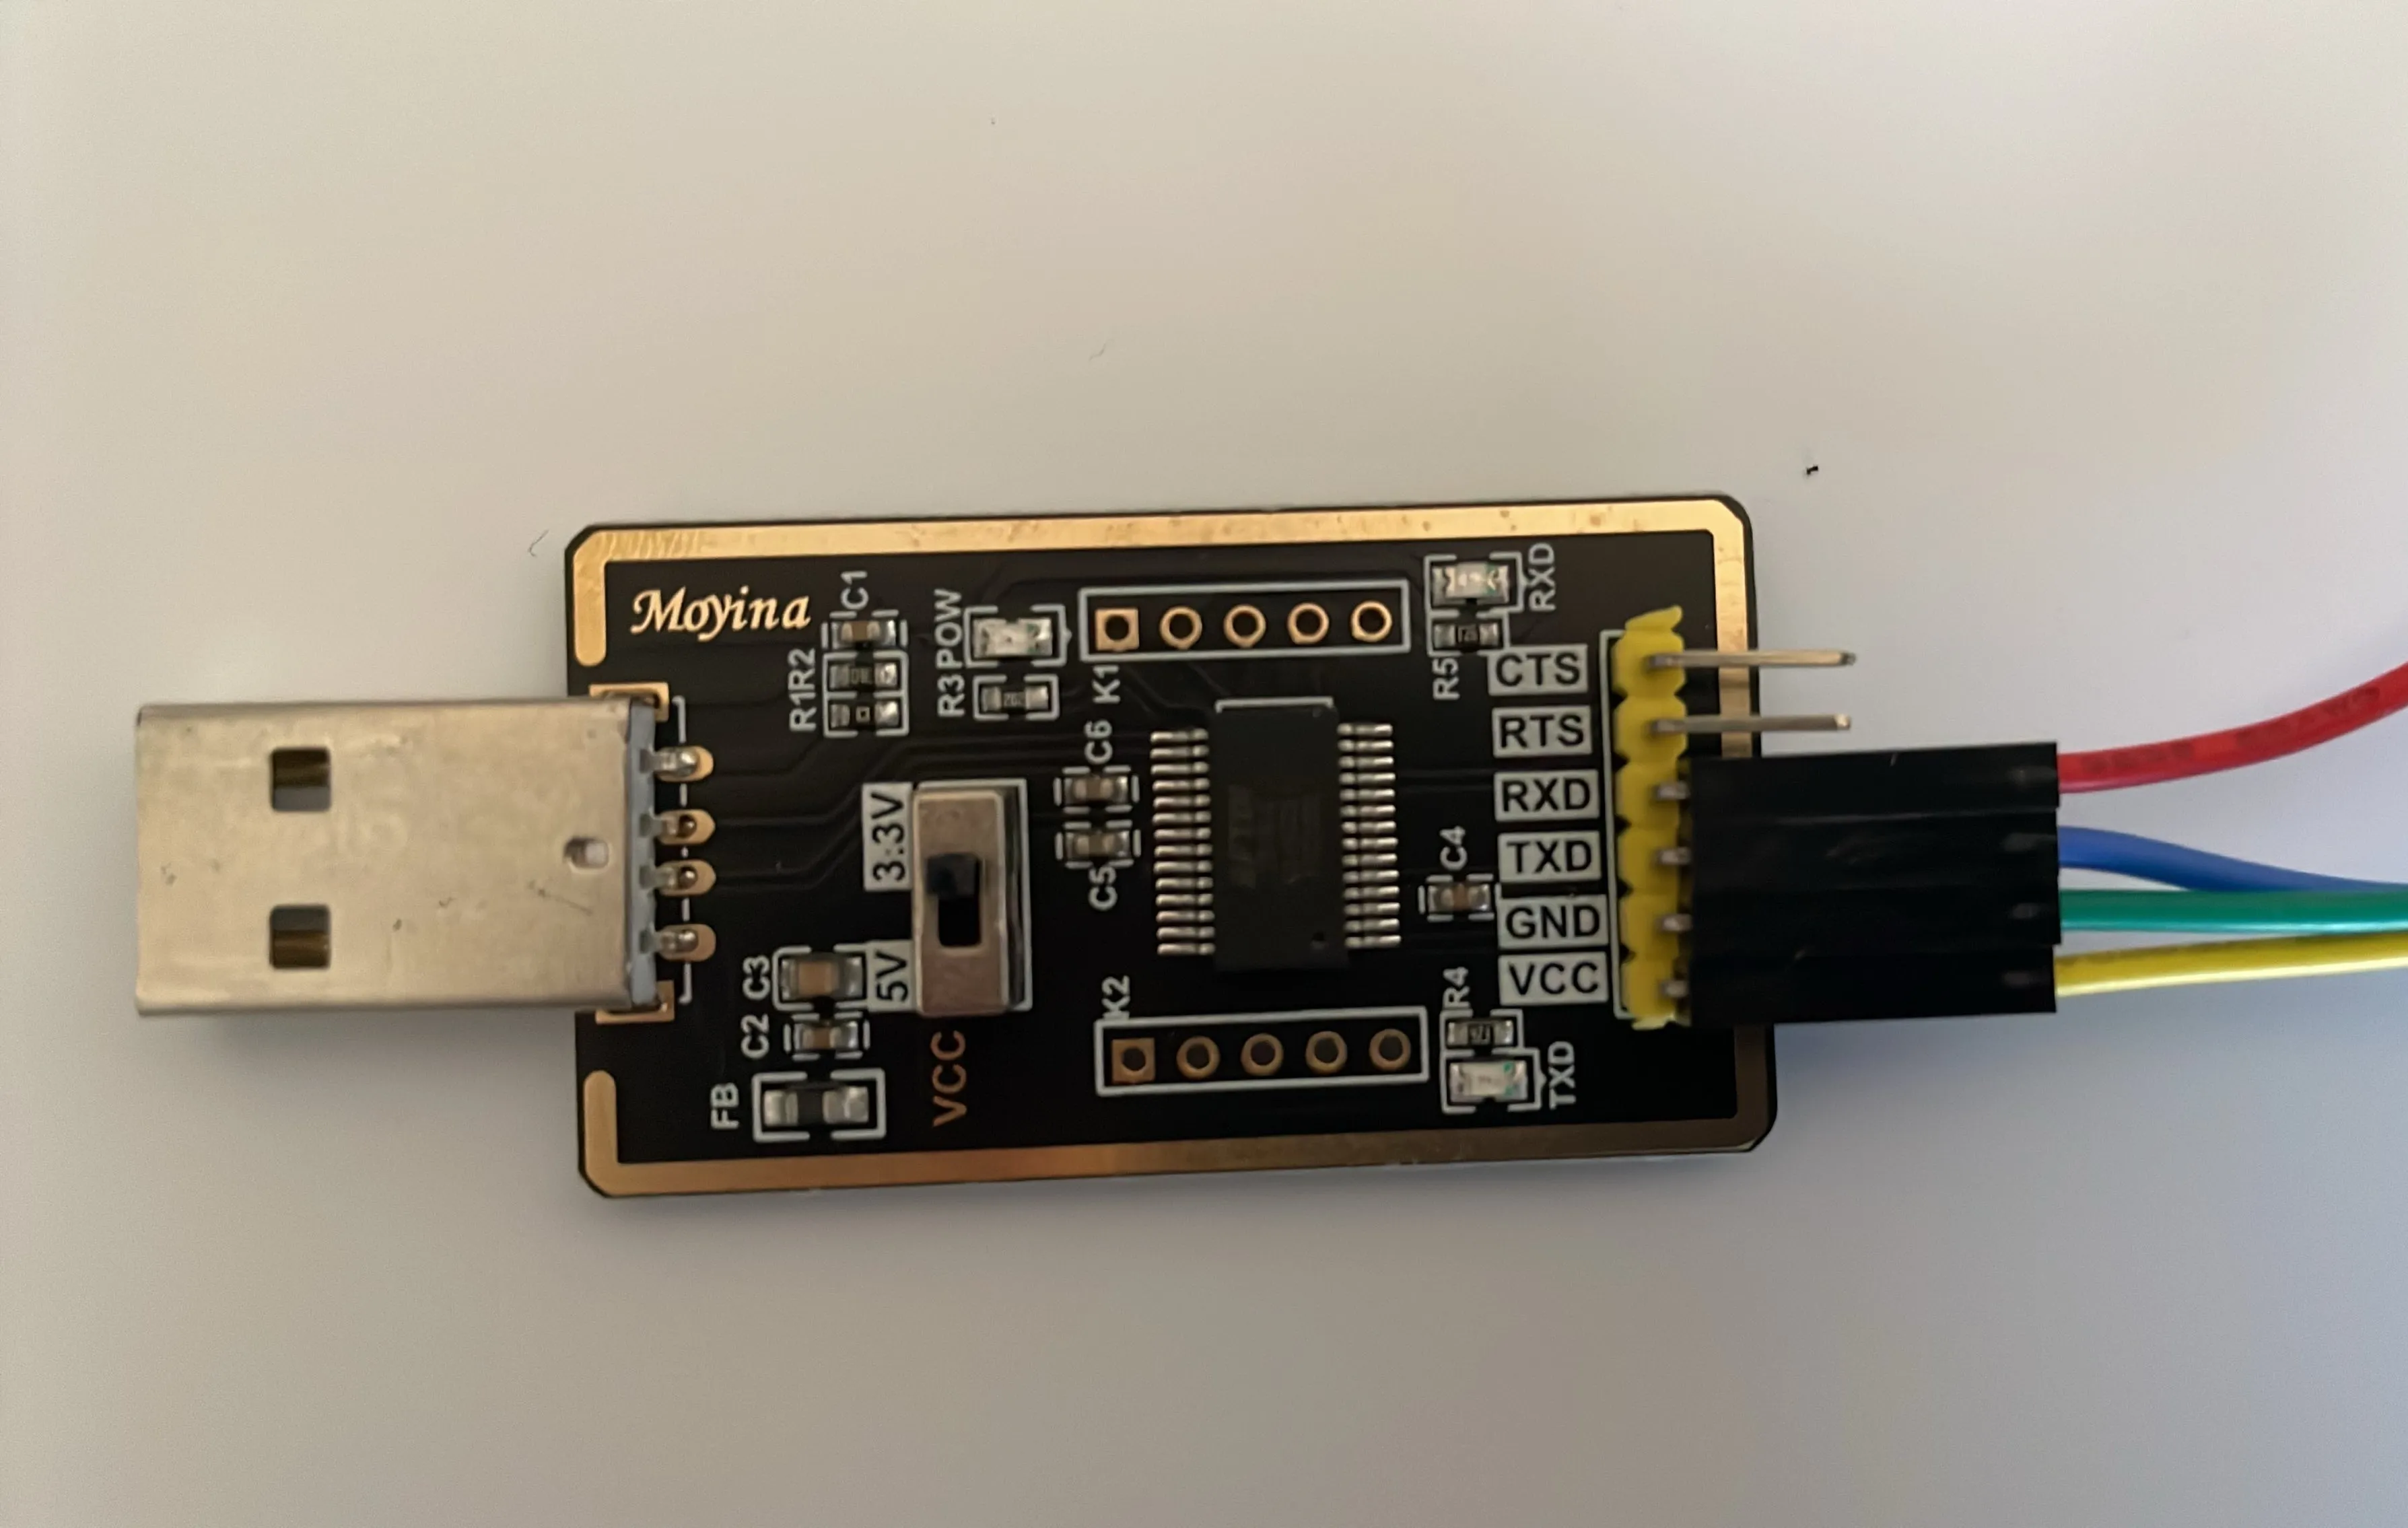
Next connect to the serial adapter the following:
VCC
GND
TXD
RXD
The colors I selected don’t mean anything specifically, just be certain you’ve made the correct connections (I’ve shown them in the diagram below connected to the corresponding pad and pin).
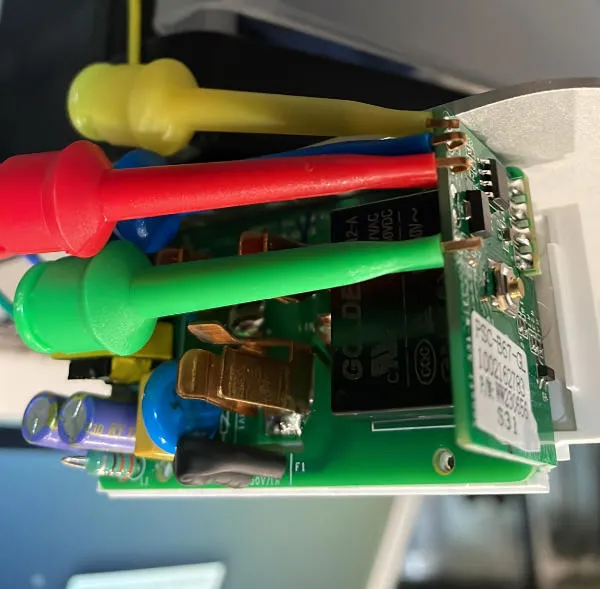
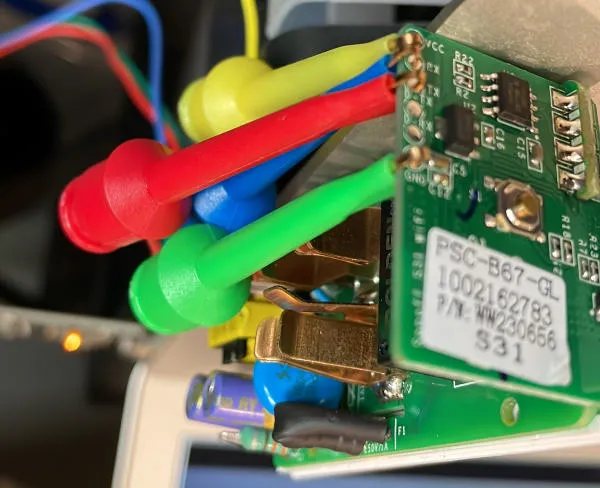
Now, using the test hooks on the Sonoff S31, you’ll connect:
USB VCC -> S31 VCC
USB GND -> S31 GND
USB TXD -> S31 RX
USB RXD -> S31 TX
Note that the USB adapter TXD is connected to the RX on the Sonoff and the RXD on the USB adapter is connected to the TX on the Sonoff. (TX = Transmit and RX = receive — makes sense that the devices can transmit and receive signals/data bidirectionally).
There are 6 solder pads on the S31. Nothing will be connected to the 2 pads directly next to the GND pad. Do not connect the USB adapter to the D-RX or D-TX pads on the S31.
It’s a tight fit to get the 4 test hooks onto the pads, but with a bit of patience, they hold firmly. Before you plug the USB adapter into power (your computer/laptop), double and triple check that the hooks are connected to the correct pads based on the required wiring and that none of the hooks are touching multiple pads. Check once more for safety (don’t rush — you’ll potentially wreck the S31 and or the USB adapter).
The USB Serial Adapter is at 3.3V, RIGHT?
Also, now’s a great time to confirm that the USB adapter is set to 3.3V. It is right?
Finger Gymnastics
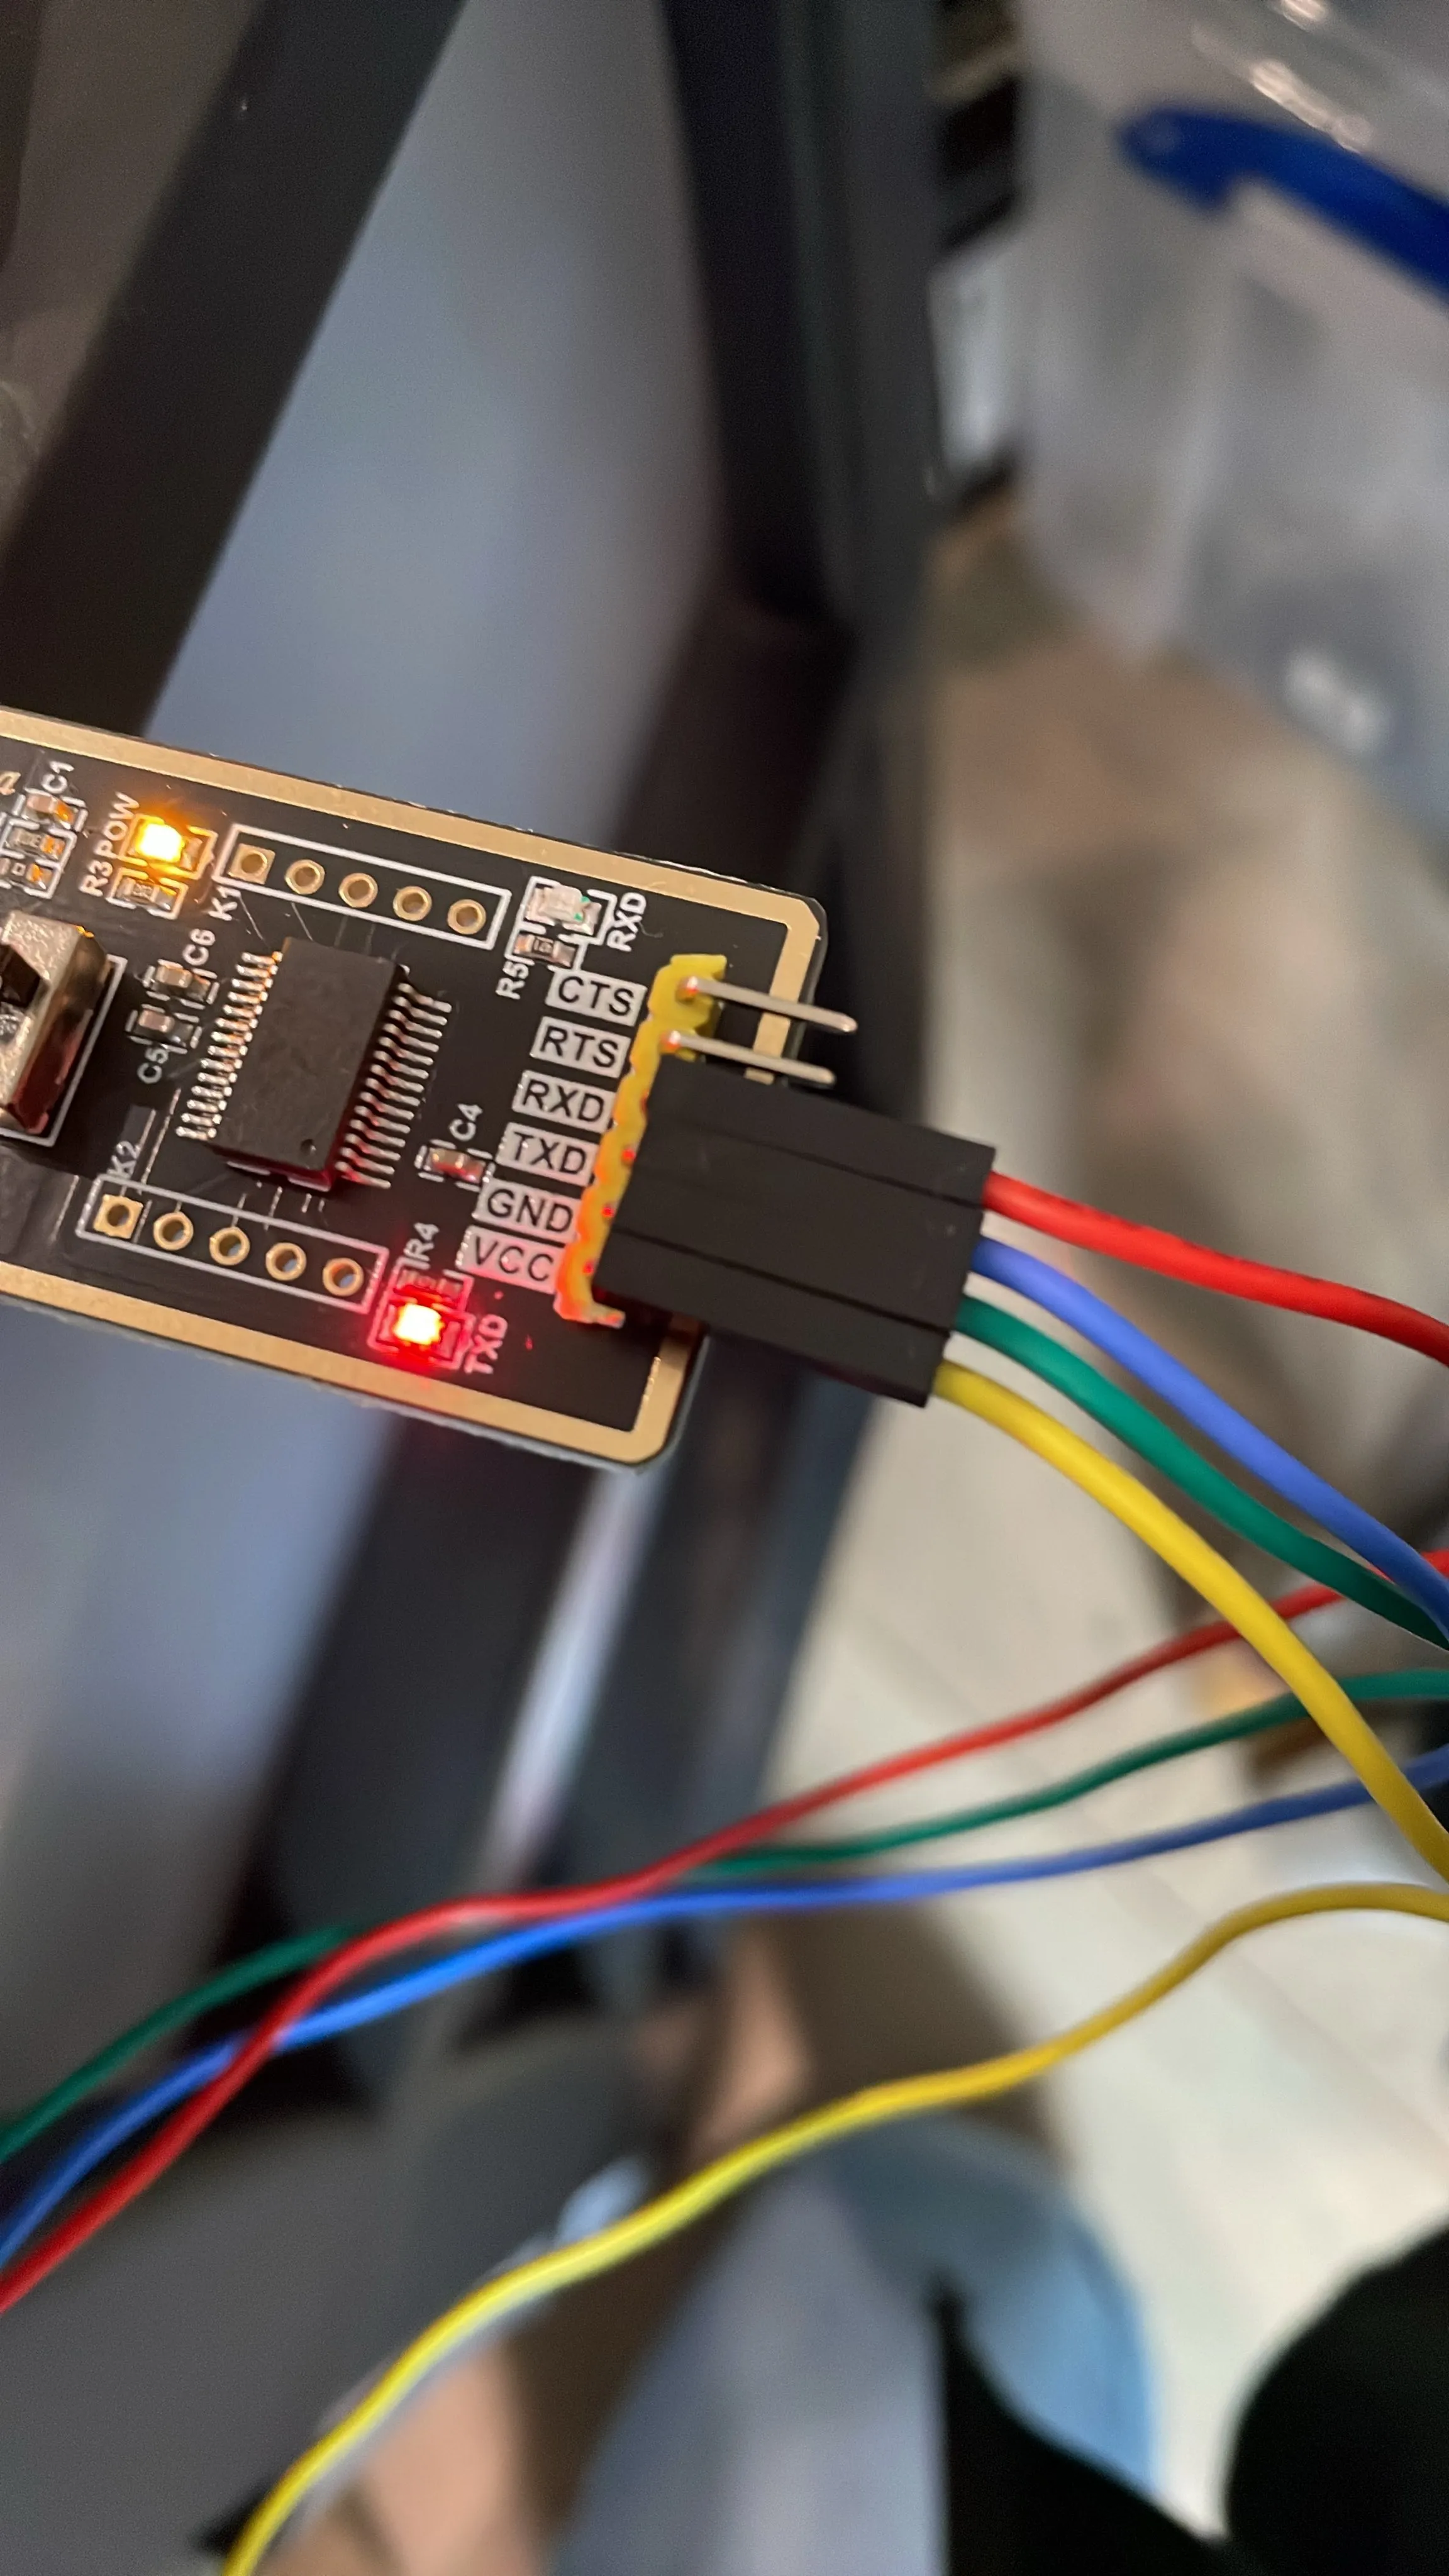
Next up are a few finger twisting moments where you’ll need to hold down the button in the center of the Sonoff S31 board, while carefully not dislodging or moving any of the test leads, AND simultaneously plugging the USB adapter into your computer or laptop (Windows, Linux, or MacOS are supported).
Here’s a simple tip: start to inserting the USB adapter into the device of your choosing, but don’t fully insert it (so that contacts aren’t made and the device isn’t recognized). Then, push the button and slide the USB adapter in the remainder of the way.
You’ll need to hold the button for a long 5 seconds and then you can release as it’s been placed into flash mode. Nothing happens visually on the S31.
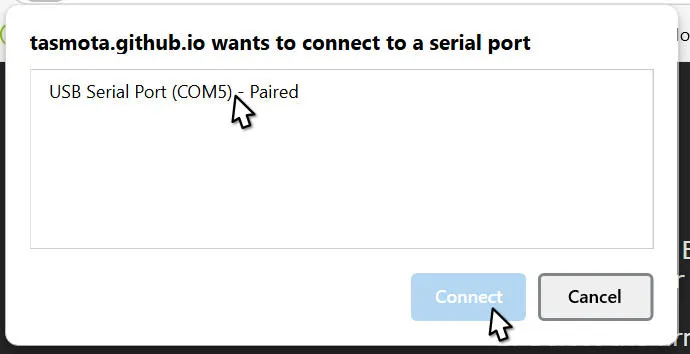
If everything has gone to plan … when you click the connect button on the page, your Chromium-based browser will ask for permission to access the USB device:
Confirm that the device is correct (the specific COM# may be different for you) by clicking USB Serial Port (COM#) - Paired, then click Connect.
If you’re using a Linux distribution, like Ubuntu, this step may fail. However, it’s fixable by using the terminal and granting permission to the USB port that was selected (when I tried it, the USB port was at the bottom of a long list of possible devices).
shell
sudo setfacl -m u:{USERNAME}:rw /dev/ttyUSB0
Substitute {USERNAME} for your current user and ttyUSB0 with the USB device you want to authorize (it will be shown in the device selection popup).
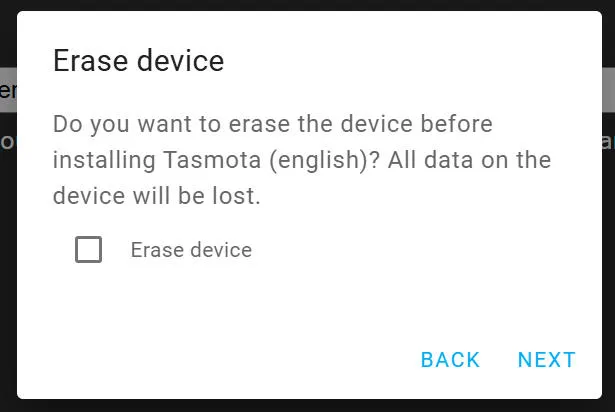
Anyway … the device dashboard is next … select INSTALL TASMOTA:
Warning — this will erase the device completely.
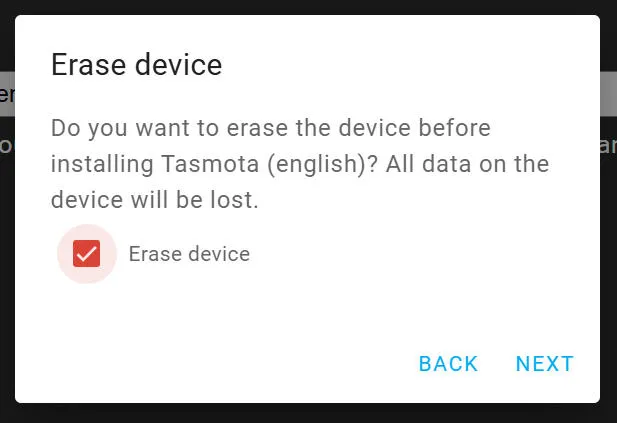
Select Erase Device and click Next.
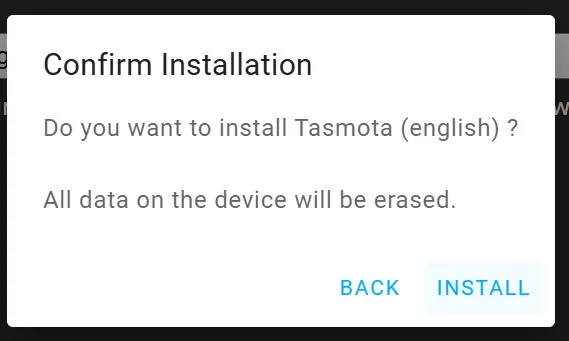
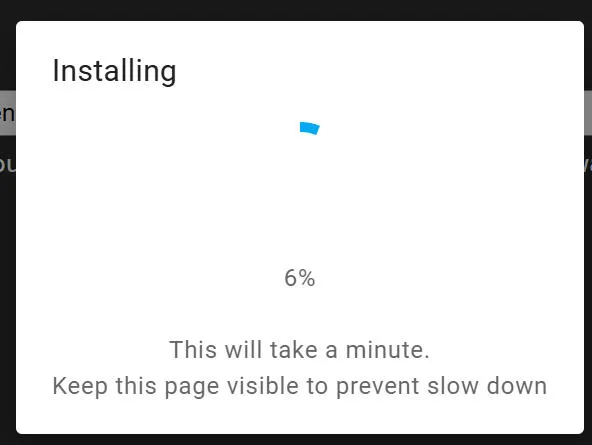
Confirm your intention again and click Install:
Now wait a while. Stretch. It takes no more than a minute or two. Don’t touch the device at this point.
Then, the moment you’ve waited for … it’s installed!
WiFi Configuration Step
Now, you’re not quite done. Some devices will automatically launch into the configuration for the device, but it doesn’t appear to happen for the S31s.
Gently unplug the USB adapter without disconnecting any of the cables. You won’t need to remove it fully from the USB socket though. Wait a few seconds and push it back in.
After 5-10 seconds, check for a new access point via WiFi. Mine looked like this:
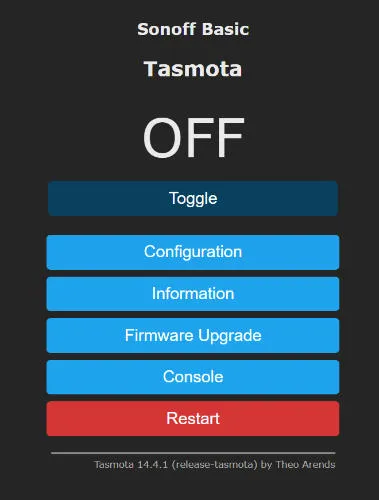
Select the appropriate WiFi. Now, through seemingly mystical … luck …, your web browser may automatically connect to the Tasmota configuration web app. Or it may not right away. But, my Chromimum based browser did every time for me, eventually. If it’s not working, you’ll need to see what the IP address range it assigned to your computer is — mine was 192.168.4.### and the gateway was 192.168.4.1. From the browser, I could have navigated to http://192.168.4.1 manually. But, as I said, the browser did automatically.
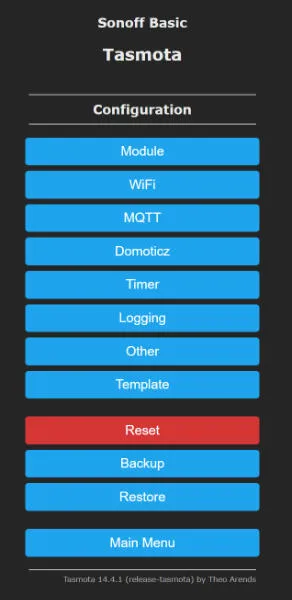
On the main screen:
Then Wifi:
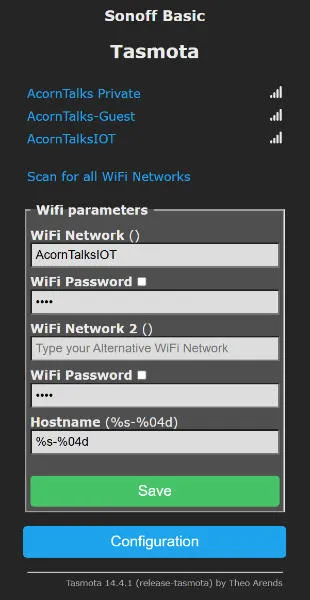
Then fill in your WiFi Information:
When you click Save, the device will reboot and provide the new IP address you’ll need to connect to (assuming the connection was successful and DHCP is doing its thing correctly!):
Once your computer has disconnected from the temporary access point, the S31 will be available on your chosen WiFi network at the IP address shown.
Celebrate.
Reassemble
Reassemble the S31 by putting the two halves back together, putting in the 3 screws, sliding the corner pieces back on, and carefully snapping the gray plastic end piece back on. Be careful to align the gray plastic piece properly and it’s likely it will need a firm push and maybe a second push for good measure before it snaps back into place. There are two alignment pegs that prevent it from being installed in the wrong orientation.
One More thing
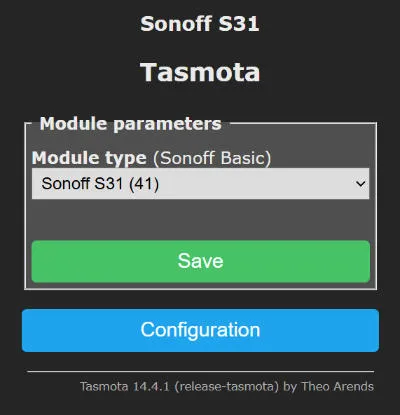
From the configuration menu of the Tasmota, select Module and choose the Sonoff S31 (41) from the drop down menu. If you don’t do this, you’ll still have a basic working smart plug, but you’ll not be able to see the current power usage and energy totals. I’m not sure if there’s a sort to the list — for me it was 11 from the start of the list. 🤷♂️
If you’re going to connect it to Home Assistant with MQTT … well, that’s a topic for another post.
I really appreciate you stopping by and reading my blog!
You might not know that each Epic blog post takes me several hours to write and edit.
If you could help me by using my Amazon affiliate links, it would further encourage
me to write these stories for you (and help justify the time spent). As always, the links don't add cost to the purchase
you're making, I'll just get a little something from Amazon as a thanks.
I'll occasionally write a blog post with a recommendation and I've also added a page dedicated to some of my more well-liked things. While you can buy something I've recommended, you can also just
jump to
Amazon and make a purchase. Thanks again!
If you buy something from a link, Acorn Talk may earn a commission. See my Affiliate Programs statement.
The trouble with many Smart Home options is that unless you buy into one cohesive platform or system, you’ll end up with a mess of applications and user experiences. It’s hard to get family buy-in when things are split across multiple applications. I find it particularly frustrating when I need to remember the brand name of a smart bulb or power plug.
Over the years, there have been a few options that have been available for both the smart home enthusiast and the “get their hands dirty” type people. I’m thoroughly in the middle. I only like so much dirt before I get a towel and wipe off. Apple Homekit and Google Home work OK for some devices, but if you want something more sophisticated… .
Let’s start with my buyer’s guide to a new Home Assistant setup for 2025 though. I’ve included some personal history below my recommendations as well and a few other tidbits and learnings.
And in case you were wondering, the text including typos and grammar errors in this document were all written 100% by a HUMAN BEING. No AI was used. Enjoy!
My 2025 Solution: Home Assistant
I’d tried Home Assistant a few times over the years since it’s initial release. It’s gotten remarkably better.
My history with Home Assistant can be summarized like this:
It once required YAML file editing for most tasks and configuration … and I REALLY HATE YAML syntax: I’d move on from Home Assistant explorations and wait.
With recent versions, they’ve added a lot of functionality to the web UI so that automations and configuration commonly happens with a point/click/drag ‘n’ drop user interface. There are still cases where complex automations require manual editing, but they are infrequent.
Home Assistant is still very much a “Smart Home Enthusiast” product.
The creators of Home Assistant describe it like this:
Open source home automation that puts local control and privacy first. Powered by a worldwide community of tinkerers and DIY enthusiasts. Perfect to run on a Raspberry Pi or a local server.
The user experience is good in some places and rough in others. Most automations are easy to build. But, there is a lot of terminology and configuration that is frankly, too “techy.” By that I mean, it’s not presented in a logical way or the terminology and techniques used to make changes are connected too closely to the underlying tech stacks that were used. Creating a dashboard of exposed devices and (entities!) is apparently vastly improved in recent versions. Yet, I’ve not managed to build a dashboard that is useful to me yet — dashboards feel far too constrained and the UI builder isn’t bad, it’s not particularly welcoming. It’s easy to build crap. Ask me how I know.
Here’s a brief list that may help you decide if Home Assistant is for you:
You find setup of a device using Alexa, Apple Home(Kit), Google Home frustrating and possibly complex. It doesn’t necessarily easier with Home Assistant. In fact, it’s likely more difficult (and involve some of the same steps you disliked originally).
You’ve never installed an operating system from scratch or built your own computer. (Yes, there are prebuilt Home Assistant hardware devices available to make that easier, but be sure you know the rest first). If you don’t want to — then, Home Assistant may not be for you.
You don’t know what DHCP is. You’ll want to know this and how to configure static IP addresses on your local network. If you don’t have access to a router or DHCP server, your experience may be degraded in some aspects depending on what you’re trying to accomplish.
You want a very polished user experience for managing the devices and automations (Home Assistant is not for you. It’s not bad by any means, but it’s not exceptional either).
You like to build computers and tinker with electronics (OK! This is probably a good match!)
If you want to have integrations with Alexa and Google Home and you’re OK with either a very complex setup or OK with an annual $65 USD fee to provide the integration, then proceed!
If you go ahead with Home Assistant and make the necessary purchases, I want to make certain that expectations you have match with reality. It’s not a bug-free do everything be-all for everyone platform. Nothing is.
It’s got rough edges and has some confusing behaviors and not every device is supported well. But, lots of things work really well and if you’re able to get your hands dirty and understand that there may be a few rough patches as you explore and build a Smart Home system around Home Assistant, then I’d definitely suggest giving it a go. With the setup I’ve got below, it’s very responsive and works very well.
I’ve been occasionally frustrated, but more often than not, very pleased with the results. If you’re on the fence and can afford to buy in, give it a try! Worst case, you repurpose the Raspberry Pi as a new little computer, maybe a game emulator!
My Requirements
When I decided to go Home Assistant, I went all in.
We use routines, schedules, automations, and smart plugs all over the house (many different brands). As with many homes, the location of lights, switches, and etc. seems poorly planned (well, often it’s just to electrical code, so … ). I’ve enhanced the control options in our house through the addition of keypads and voice assistants. For various reasons we settled on Google, but we’d switch to something else once it becomes reliable AND affordable.
I’ll detail out everything I bought below, but here were the basic requirements I settled on:
Apple HomeKit Compatible (through a Apple HomeKit bridge)
Google Home Compatible
Fast (for both user interface interactions, but also operationally)
Low Power (electricity), small device.
An “appliance” like experience for the device
SSD rather than SD card for storage (fast and more reliable)
Long lasting — I don’t want to need to upgrade hardware in less than 3 years except for failure.
After far too much research, I settled on a Raspberry Pi 5 with 4GB of RAM. It’s more than very capable of running our Smart Home today, but as I wanted this to continue to perform for many years. Nothing I read suggested that Home Assistant would need more than 4GB of RAM, so I decided to not splurge on the 8GB. I could have used a Pi 4, but again, I went with the “longer lasting” option. I could buy an 8GB model and upgrade if RAM becomes a bottle neck in the future.
Nabu Casa (primary maintainers of Home Assistant) sells two “ready to go” devices. A “yellow” and a “green”. (buy). Skip it if you can. You’ll get faster hardware and be able to make upgrades/changes if you go it alone. The Green model for example doesn’t include Zigbee, Zwave or Bluetooth.
I’d considered a Intel based mini-PC, but the reviews were all over the place in terms of reliability and Raspberry Pis are known to generally take a beating and keep on ticking (digitally), so I moved on from the mini PC. It also seemed like except for the most basic PC hardware configurations, the total cost was going to be more than a well-featured Pi 5 combination.
NVMe SSD
There are a number of ways to add a SSD/NVMe to a Pi5 and I decided to go with an option that allowed a full length NVMe M.2 SSD (2280). 2280s are less expensive and there are technically more options available. However, as noted below, you’ll want to check SSD compatibility with any expansion you buy for the Pi5, as apparently, not all SSDs work in every configuration. Before you buy the SSD, confirm it works — the Crucial model below was confirmed to work by Pimoroni (on the product page under a heading Drive compatibility).
I 3D printed a case for the resulting combination of Pi5 and SSD expansion. I couldn’t find a case that I liked that was compatible and wasn’t metal. The Pimoroni model attached to the base of the Pi 5, so there are fewer standard cases for it. Depending on the type of NVMe expansion used, you may have more options. Given I’ve just tucked the resulting system away on a very high shelf in our pantry, I don’t see it anyway, so a case wasn’t strictly necessary.
I did buy a tool-free NVMe USB drive enclosure to make installation of Home Assistant easier. It definitely wasn’t necessary, but I’d wanted the enclosure anyway for other purposes as well.
The Shopping List
These items are what I’d suggest you start with as a purchasing guide if you want to start from zero. Some of you may have a few of these items on hand that you can repurpose. (I did not.)
I did a lot of research for each item before settling on this combination of hardware pieces. I hope you find it useful. Please support my efforts by using my affiliate links.
Raspberry Pi 5 4GB ($60) - Buy this at your favorite authorized retailer as Amazon marketplace sellers often only have kits with junk included or the price is much higher
Raspberry Pi 5 Power Supply: Official Raspberry Pi 27W PD Power Supply 5.1V 5A with USB C ($12) - Same as Pi 5 (buy from an authorized retailer)
NVMe M.2 Drive: Crucial P3 Plus 500GB PCIe Gen4 3D NAND NVMe M.2 SSD (buy)
NVMe Base for Raspberry Pi 5: Pimoroni NVMe Base for Raspberry Pi 5 (link) (buy) ($20-$30)
Zigbee Adapter: SONOFF Zigbee 3.0 USB Dongle (buy)
Z-Wave Adapter: Zooz 800 Series Z-Wave Long Range S2 USB Stick (buy)
Official Raspberry Pi 5 Active Cooler ($5) - Buy it from an authorized retailer (it’s available on Amazon, but you’ll pay more than double its regular cost)
NVMe Enclosure (only needed for setup and later hobby projects): SABRENT USB 3.2 Type C Tool Free Enclosure for M.2 PCIe NVMe and SATA SSDs (buy)
Short USB 2.0 Cables - Needed to move the antennas for the Z-Wave and Zigbee antennas away from the Pi (and anything else around). (buy) Don’t skip on these. Get USB 2.0 (according to forum posts, 2.0 will be better than 3.0). Rather than guessing about my own supply of options, I bought 2 of the cables as they weren’t expensive.
If you do use the Pimoroni, the instructions for how to best install a Pi compatible OS and the drive itself are here. There is an official Raspberry Pi 5 M.2 HAT+ now (buy). It only accepts the slightly more expensive 2230 and 2242 NMVe drives if that matters to you. Of course, it’s well supported. The Pimoroni HAT instructions may seem a bit long and complex, but it’s well documented. Just follow along and in no time, it you’ll be ready. The SABRENT enclosure makes copying the OS to the SSD wicked fast. I was so accustomed to Pi OS installations to SD I doubted that the copy had even worked!
The setup for Home Assistant starts after assembling the NVMe HAT.
While setting all this up — I also switched all of our smart switches to Lutron Caséta. But, that’s definitely for another post. Eek!
And for the watchful eye, the box for the Pi 5 says “8 GB” and I said I used 4 GB for Home Assistant. I’d recycled the box for the 4 GB version already, but not for the 8 GB that I’m going to use for another project.
SSD vs SD Card
If you don’t want to spend the extra money for the (statistically speaking) longer lasting SSD option, I’d strongly recommend you buy a High Endurance SD Card. They’re designed for more writes than a more commonly purchased SD card. Use a SSD though if you can.
Either way: Backup your setup!!!
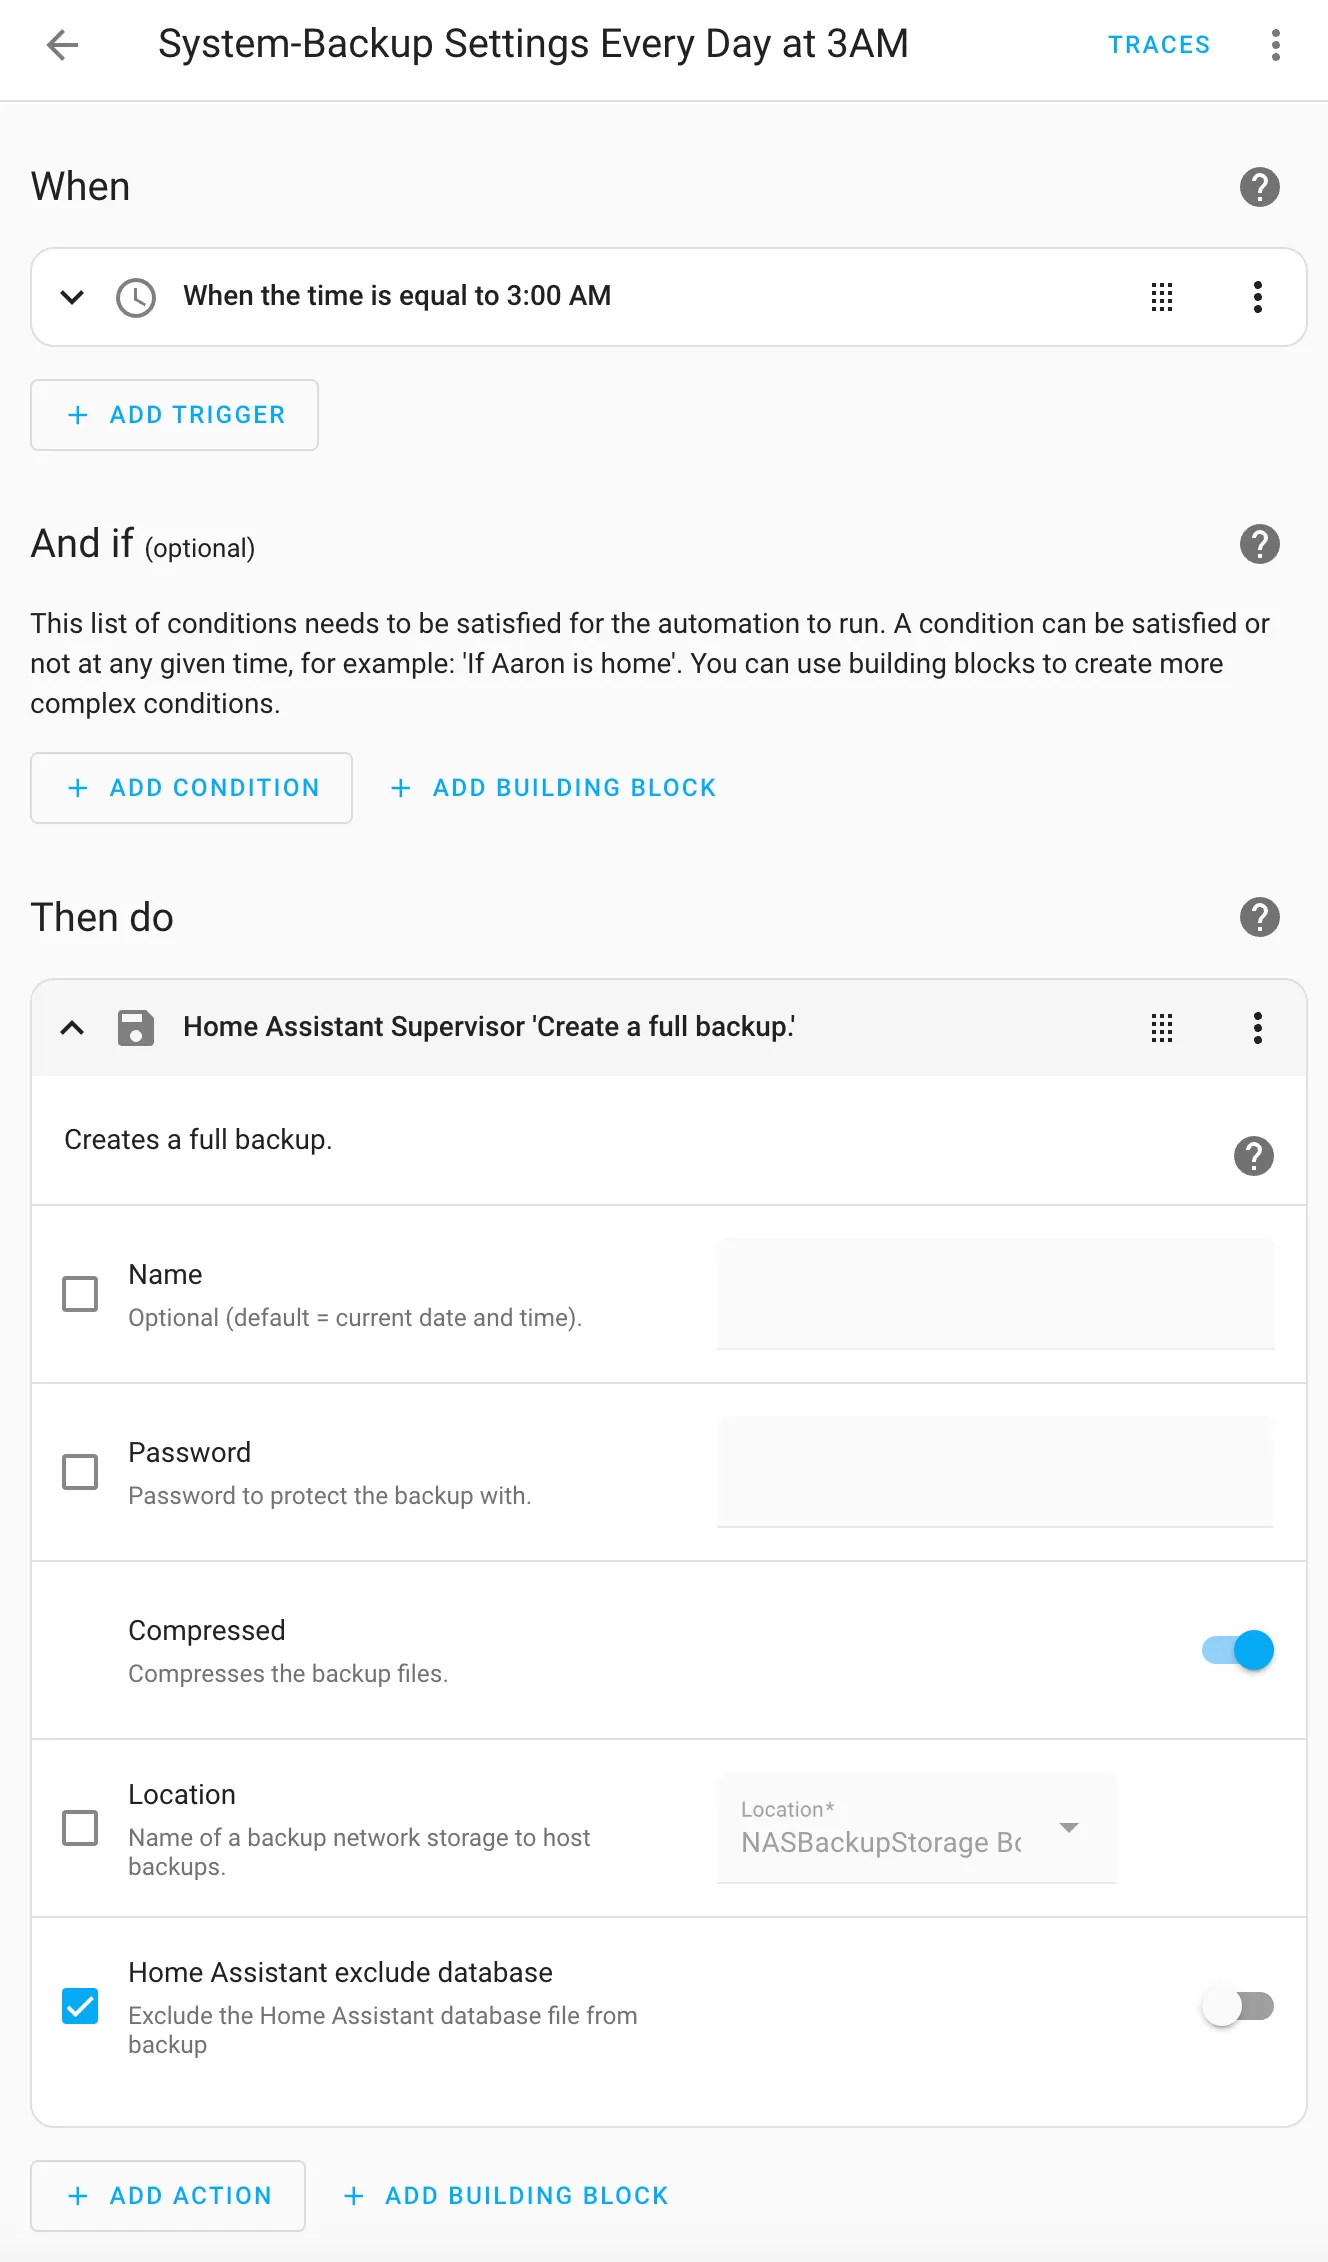
Create an automation to back up the configuration of your setup. Set it up to save a backup on a secondary disk. I have a storage location on a NAS available for the Home Assistant supervisor backup process (as shown below):
yaml
alias: System-Backup Settings Every Day at 3AMdescription: ""triggers: - trigger: time at: "03:00:00"conditions: []actions: - action: hassio.backup_full metadata: {} data: compressed: true homeassistant_exclude_database: falsemode: single
Home Assistant Routines
As of this writing in mid November 2024, I’ve got 56 automations setup and 150+ devices.
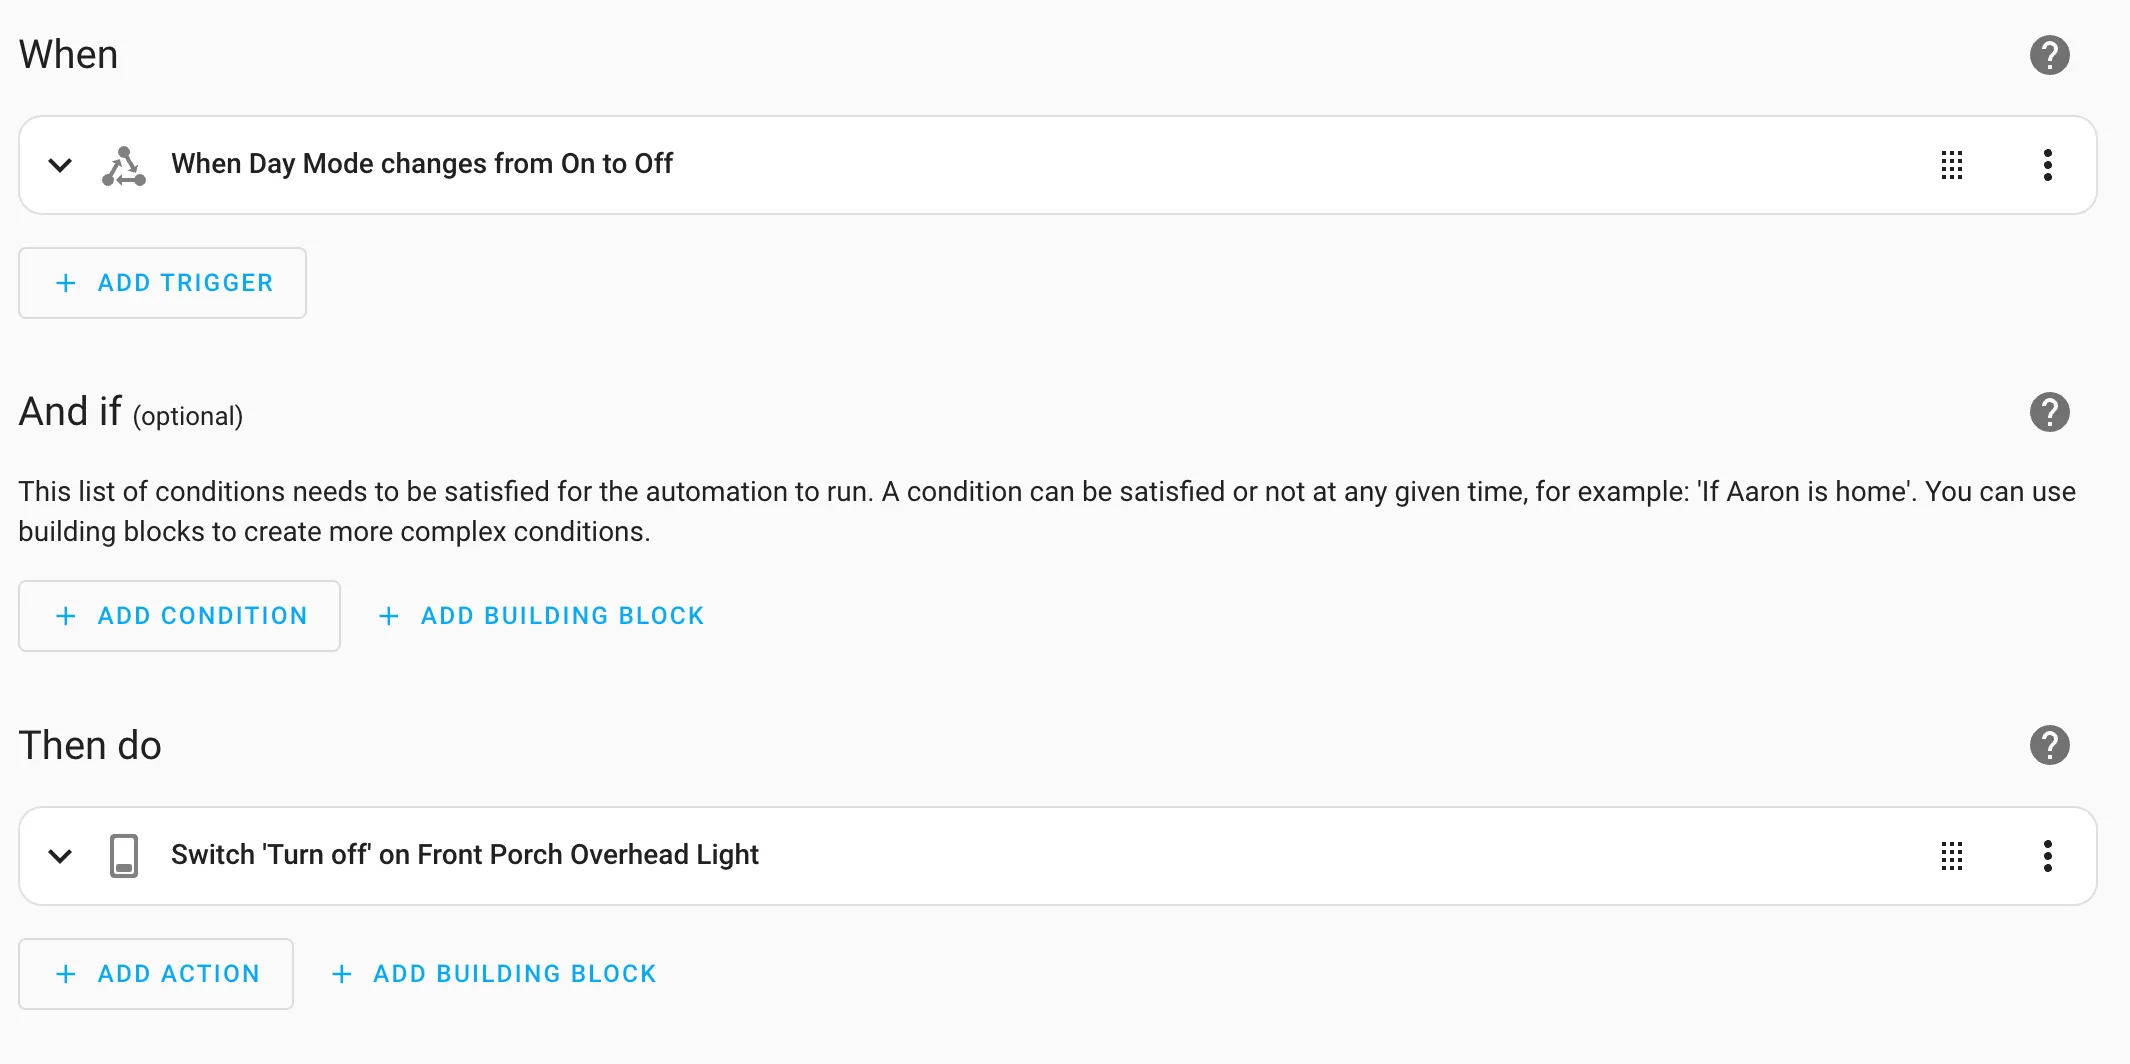
The messiest automation so far has been to setup a random time for an end of “Day Mode” so that the outside lights would turn off after a specific time every day, but not at the same time (so our house seems more lived in always). It involved Helpers, templates and a few automations.
It works well now. Randomization functionality isn’t exposed as a pattern that’s easily accessible in HomeKit, so I had to do a lot of reading and experimenting (and go figure, there are opinions about what is the best way!). Hubitat had it built in so it’s absence when I moved automations from one system to another was sorely noticed.
At the start of every day my instance of Home Assistant creates the randomized “night mode” time and stores it in an input datetime called random_offset_time as part of a basic automation. Night mode for my house is at 21:30 plus a random 15 minutes (900 seconds).
yaml
alias: Set (RANDOM) Night Mode Time Every.strftime('%H:%M') Daydescription: ""triggers: - trigger: time at: "00:00:00"conditions: []actions: - action: input_datetime.set_datetime metadata: {} data: entity_id: input_datetime.random_offset_time time: >- {{ (strptime('21:30:00', '%H:%M:%S').timestamp() + (range(0, 900) | random)) | timestamp_custom('%H:%M:%S') }}mode: single
Alexa and Google Home Integration
As I mentioned above, Home Assistant can integrate with Alexa and Google Home. If you want to do it yourself — the steps are very complex and require setup that I’d guess most people won’t attempt. It is well documented, but there are a lot of moving pieces involving 3rd party services (like Google Cloud).
I’ve been doing software development for many decades and … ugh. I didn’t want to go through with the setup.
Nabu Casa offers a “Home Assistant Cloud” service. In addition to enabling voice assistants with a single click (and then enable devices to be exposed as desired), they add (included, but optional) support for remote access to your Home Assistant Instance.
While the cost of $65/year USD is a bit high, I consider it the easiest way to help fund the development of Home Assistant, and I get a feature we routinely use: voice assistants around the house. Win win.
Migration
One more thing, I didn’t switch to Home Assistant overnight. I slowly removed devices and automations from Hubitat over to Home Assistant over the course of a few weeks and that went well. Even though there was some definitely odd Z-Wave stuff happening at the beginning where it seemed like there were conflicts between the Hubitat Z-Wave mesh and the Home Assistant Z-Wave mesh, it sorted itself out on its own.
I did need to continually rebuild the Z-Wave network in Hubitat as I removed devices otherwise a number of devices became unreachable.
Also, I like to explicitly add devices so turning off this functionality in Home Assistant was very helpful:
You can find it here: Settings > Devices & Services > Integrations (tab on top) > Z-Wave > Vertical Three Dot Menu Button (ugh!) > System Options
Disable “Enable newly added entities.” as shown above.
Until I did that Home Assistant was locating devices too quickly, and discovered even a few that I still can’t figure out (neighbor’s devices?).
Conclusion
Home Assistant may be the best Smart Home setup in 2025 for you. If expectations are reasonable and you understand what you’re getting into, it’s likely a good match. I’d strongly suggest anyone interested verify that the hardware and integrations you want to use are supported so you don’t end up disappointed right out of the Smart Home gate. Do not assume that everything you want to use will be supported fully. Especially check if there are “must-haves” that you don’t want to lose if you’re migrating from another Smart Home solution (like SmartThings).
I like what I’ve got setup now, but I’ve also had to invest in the setup and configuration. I’m mostly excited about it “just working” and me not needing to tinker with it anymore.
There are plenty of great resources available to learn more about Home Assistant both on web pages and on YouTube. A fair warning though: check the publish date and the version of Home Assistant they’re using. As mentioned, a lot has changed, and the way some tasks are done has changed dramatically in some aspects which can make following along a challenge.
Thanks for reading! I hope you’ve found this useful.
Establishing Smart Home Credibility
I thought to include some back story about my Smart Home journey and why I chose Home Assistant below.
No more X-10 (thankfully)
I will date myself by admitting that I did have some X-10 hardware running in my house successfully for many years. It wasn’t great and wasn’t always reliable, regardless of the various attempts I made over the years to improve it. I even had an electrician install an X-10 booster in the electrical panel to improve the signal.
When I moved to a larger house, with multiple electrical panels — X-10 wasn’t a reasonable option as the signal needed to bridge the service to both panels, there was more wiring … it just didn’t work. It was only reliable at being thoroughly inconsistent.
For quite a few years I tried a variety of products. I generally stayed away from products that required power-line as the solution as they weren’t usable in our house. (Yes, I even tried Insteon, but it was a failure in our house for reasons that I couldn’t quite understand).
On to the SmartThings (sort of)
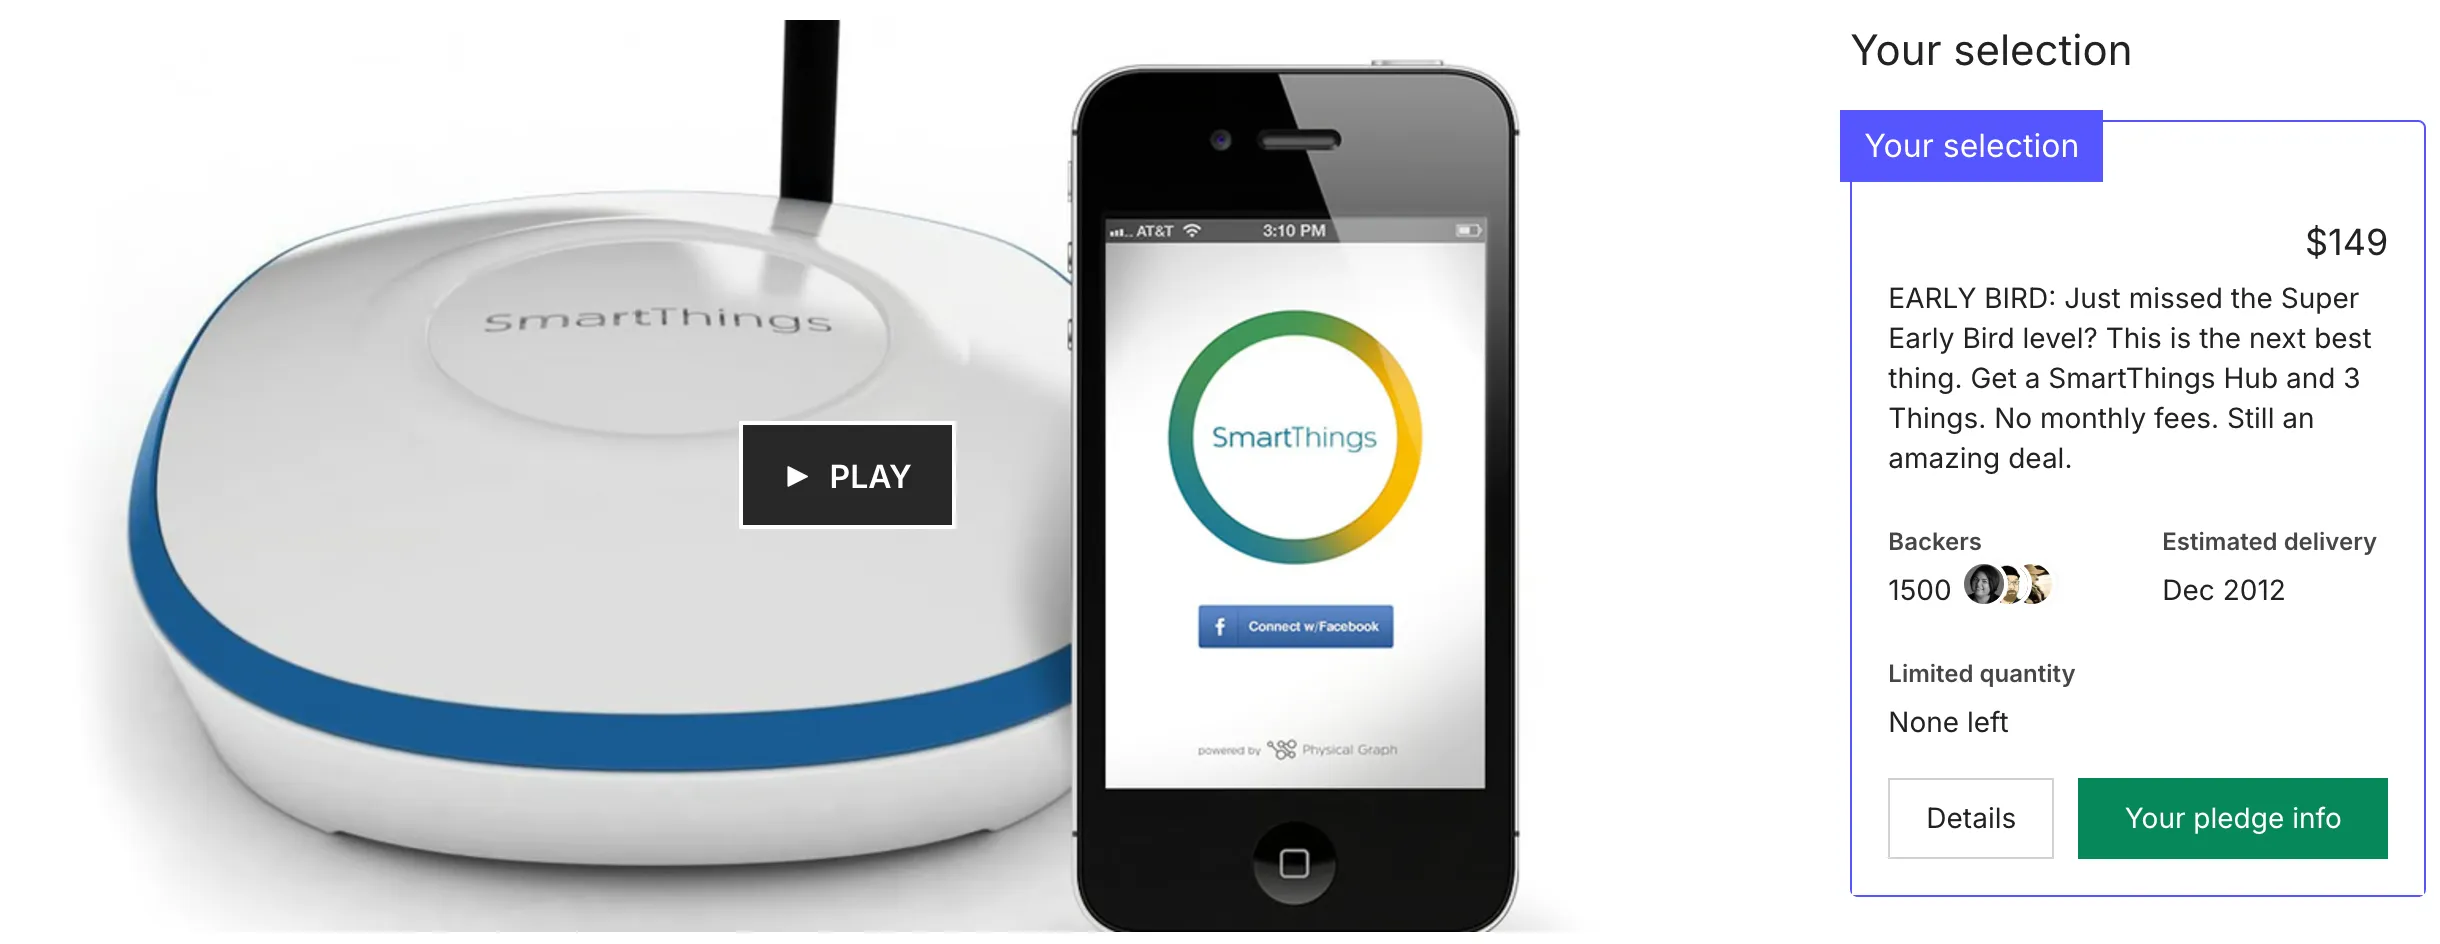
Dismayed by options, it wasn’t until that this Kickstarter was announced that I decided to try my luck again.
SmartThings (prior to Samsung buying the company).
As you can see — I did get in early (but not the SUPER EARLY BIRD).
The best part about the version one of SmartThings really was that it was trying to put a consumer friendly experience around what was traditionally a tragically mediocre (at best) home automation experience.
Their hardware was … average. The software … clunky. The reliability, not so much. The wall receptacles were definitely OK for their time. The newer models were a lot easier to use and I still have some of them doing daily duty around the house (they’re Zigbee based).
It took several hardware versions and many more mobile application versions for the SmartThing ecosystem to find its footing and provide a better software and hardware experience. It still was limited and too much of the control was cloud-only. My home at the time was served by a slow DSL connection, which meant cloud-controlled devices reacted slowly to live-requests.
I stumbled upon Hubitat Elevation a few years after version 3 of the SmartThings hub was released. Hubitat’s company history is interesting as it was a “spin-off” from disgruntled/unhappy SmartThing’s vocal users. Hubitat has gotten so much better over the last few revisions of hardware and software and definitely—if it weren’t for some issues I’ll talk about—could be worthy of consideration in many households (but it’s still very much an enthusiast-only product). The community seems to be very upbeat and it’s frequently enhanced.
Hubitat started to be Bad: Review
Until about 6 weeks ago, Hubitat was my primary home automation/smart home system. But, I’d grown so tired of issues around the house caused by it and my unfortunately extensive Z-Wave setup.
I didn’t want to switch honestly as I had a lot of time and effort invested into the system and the hardware that worked well with it. I’d bought the latest Hubitat C-8 Pro device and things were going OK for a while — until the system started to fail routinely randomly. I hadn’t realized that they maintain a tragically awful warranty (90 days?!) so a return/replacement was out of the question. The device would just sit there — dead. Many lights and automations wouldn’t work.
90 days. That’s the length of time you use when you have no confidence in your product.
My wife would announce, “the lights aren’t working again …” I’d sigh, and … use the Kasa TP-Link app to remotely turn off the Hubitat’s power to cycle it. When things went bad, it wouldn’t respond to any requests and the built in web server (and admin server) wouldn’t respond. So, death by power removal was the best option to recover it (using the Kasa Smart Plug HS103P4).
I followed all the trouble shooting steps that Hubitat offered. Not a single one made it more reliable. I’d had it on a reboot cycle (via an add-on app for Hubitat) that was set to nightly, but it didn’t seem to make things better. I needed to kill the power every few days to hard cycle the Hubitat.
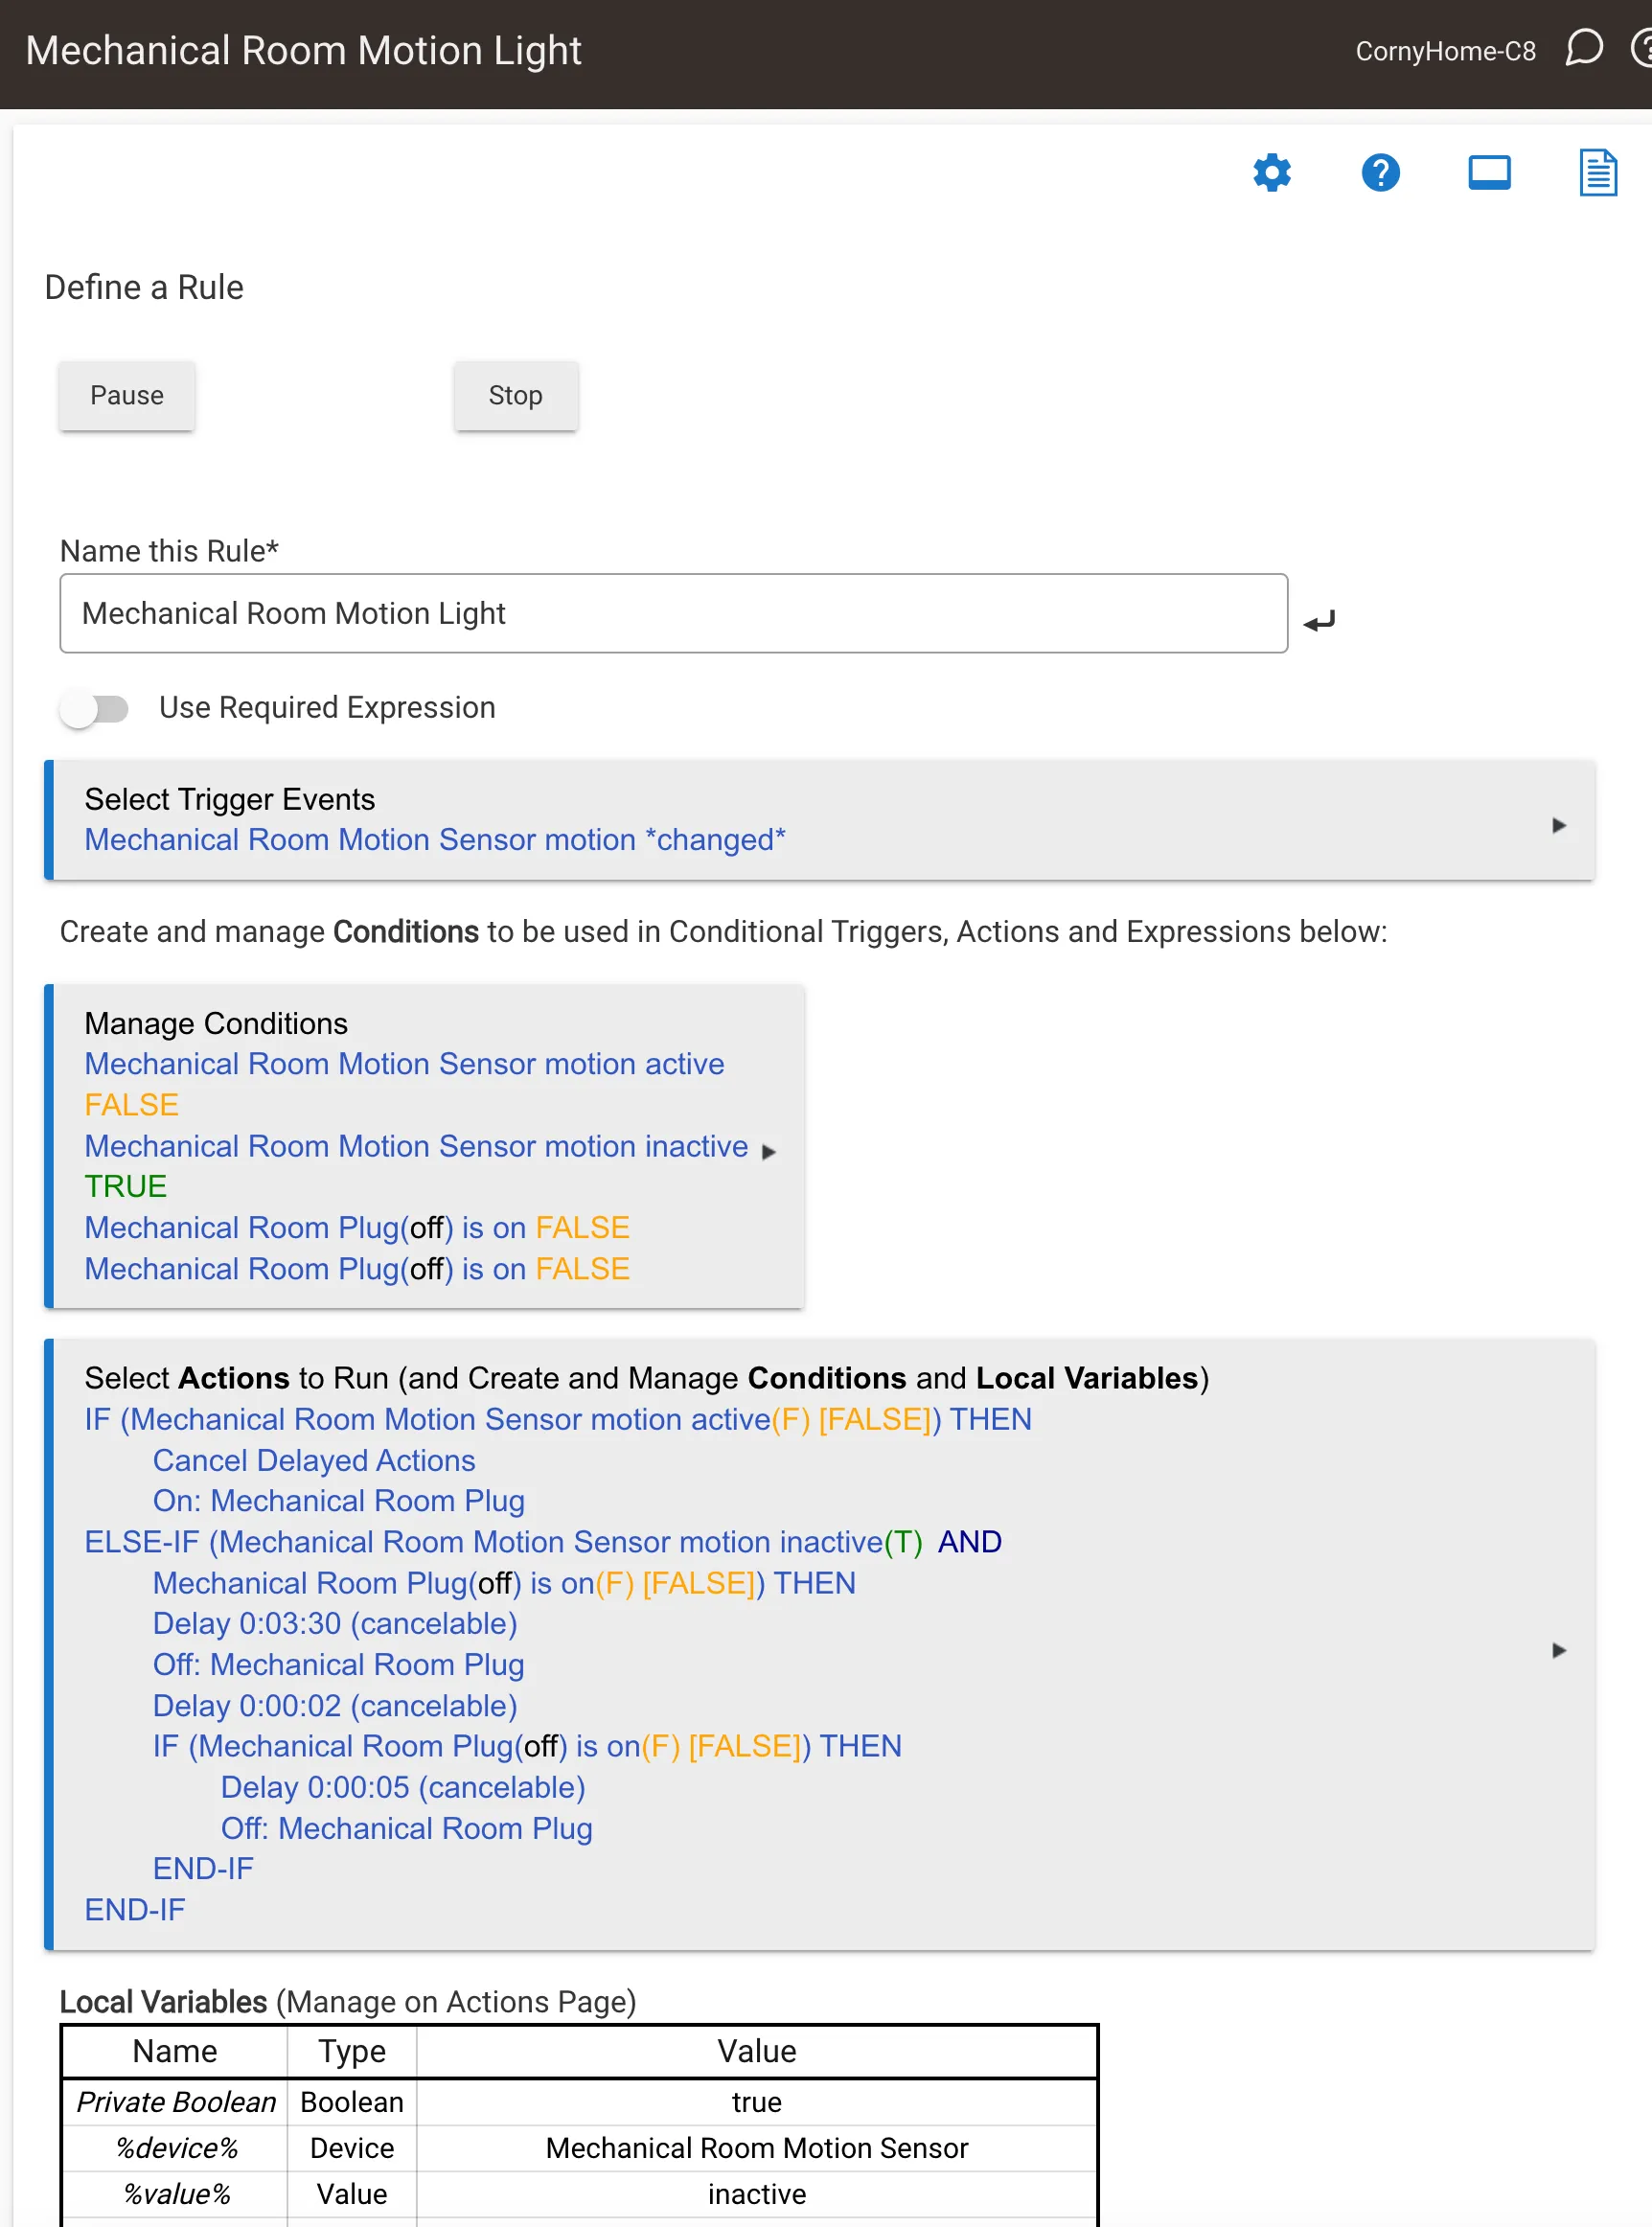
If you ignore that problem as a potential one-off hardware issue (that was going to require me to buy an entirely new device), I still wouldn’t recommend it if you’re starting out with home automation. They don’t have a product that is suited for use by casual DIYers. It’s very clear the more you’re wired the way the developers thought about how to solve problems the more in tune you’ll be with the quirky system.
Below is a snapshot of a “Rules Engine” setup. For those who have Hubitat’ed recently, they also have a specialized “Motion App” that I found nearly impossible to understand. I found the workflow, terminology and instructions to be inscrutable with any reasonable amount of effort on my part. Not that this is a lot better, but it was at least in my control:
And with the awful warranty — I can’t recommend buying a Hubitat. A few years ago, I think they were a contender and I’d recommended it to a few friends, but it’s not worth it anymore. They’ve baked in a lot of features and a lot of bugs apparently with hardware they don’t stand behind. If you love Hubitat and haven’t had any problems, good for you! That hasn’t been my experience.
Nerding Out
I have Home Assistant running on an IOT VLAN using UniFi. That’s a bit of a head scratcher to get it working and so that it can properly bridge a VLAN network (if desired). That requires executing this line from the HA console:
shell
ha network vlan end0 1 --ipv4-method auto --ipv6-method auto
And then in the UniFi configuration for the device port connected to the HA hardware, you’ll set the Native VLAN/Network to the IOT network, set Tagged VLAN Management to Custom, and then add a Tagged VLAN for the VLAN where you also want to expose an IP address. In my case it was Default.
By doing that though, it made Apple HomeKit configuration not work. The fix:
To /homeassistant/configuration.yaml, I added this block:
yaml
homekit:
    - name: HA HomeKit Bridge
      ip_address: 192.168.2.29 # static IP address
      advertise_ip: 192.168.2.29
      filter:
          exclude_domains:
              - automation # this was to remove automations from being exposed in HomeKit as devices
I have a Modern Forms fan that isn’t very reliable for automation. However, it’s gotten better now that I’ve added an automation to trigger a periodic reboot of the fan controller. Interestingly, it doesn’t affect the “live running” fan in any noticeable way, it’s purely the controller.
To /homeassistant/configuration.yaml, I added this block:
The IP address 192.168.7.99 is the static IP address of the Modern Form’s fan controller. Then I created an automation to trigger the reboot via a Perform Action: Action:RESTful Command: reboot_mf_lr_fan.
I really appreciate you stopping by and reading my blog!
You might not know that each Epic blog post takes me several hours to write and edit.
If you could help me by using my Amazon affiliate links, it would further encourage
me to write these stories for you (and help justify the time spent). As always, the links don't add cost to the purchase
you're making, I'll just get a little something from Amazon as a thanks.
I'll occasionally write a blog post with a recommendation and I've also added a page dedicated to some of my more well-liked things. While you can buy something I've recommended, you can also just
jump to
Amazon and make a purchase. Thanks again!
I’ve decided to indefinitely pause publishing my Epic content.
2025-02-19 update:
I’ve decided to occasionally post more Epic content, but not to any specific schedule or … 🤣 cadence.
If you can help by supporting the site (Amazon affiliate links), or sending thoughts and memories about your time at Epic, … it will help me be inspired to write more. While I’ve gotten some great feedback and interaction on occasion, it’s like talking to the void right now — I don’t know who is even out there besides AI/LLMs training on my content!
When this side-project/hobby feels like unpaid work, 😟 … next hobby please.


 You can find it here: